(Food is Love. Food is Culture. Food is Connection. Food is Adventure.)


Showing posts with label bacon. Show all posts

Wednesday, November 21, 2012

Coq au Vin

In the interest of getting our butts back in gear, cooking more at home, and ensuring leftovers for lunches (we've been spending an obscene amount of money in restaurants and on take-out lately), we recently selected this Coq au Vin recipe to try out, from Julia Child's beloved Savenor's Market.  Having never done a Coq au Vin before, I planned to stick to it as exactly as possible, but there did end up being a few small changes.  Here's how it went (our version, not theirs)....

INGREDIENTS
  • ½ pound of sliced bacon, cut into quarter-inch pieces
  • 40 frozen pearl onions
  • 3 pounds of chicken thighs and legs, skin on
  • 8 garlic cloves, peeled
  • Salt and Pepper to taste
  • 2 cups homemade chicken stock
  • 2 cups red wine (the original recipe called for pinot noir, burgundy or zinfandel -- I just used up what I had leftover, and honestly I have no idea what kind it was)
  • Dried thyme
  • Dried parsley
  • ½ pound of button mushrooms, roughly chopped
  • 2 Tablespoons of butter

PROCEDURE

First, I gathered up and prepared most of the ingredients (chicken, chicken stock, wine, bacon, onions, garlic, butter, and mushrooms).


Next, I decided to skip the step in the original recipe of blanching the bacon, and went straight into browning it on medium-high heat in a dutch oven that would be big enough to hold all the chicken.  This took about ten minutes.


Removing the crisped bacon (but not the rendered fat) from the pan, it was then time to work on the chicken.


I worked in two batches, heat still on medium-high, putting half of the chicken pieces and half of the onions right into the hot oil and leaving it for a few minutes to brown.


Then, I flipped it over, added half of the garlic, salt and pepper, and left it for a few more minutes to brown on the other side.


All of it (chicken, garlic and onions) was then removed from the pan.


I dumped the fat out of the pan, and added the chicken stock and wine to deglaze.  After which, the chicken, onions, garlic, and bacon were put back in, along with some parsley, thyme and two bay leaves.


I brought it to a boil, then reduced the heat and covered it, and let it simmer for 20 minutes.


Next, I took the chicken pieces out of the pan and set them aside, and it was time to work on the sauce.  I didn't remove the onions (as suggested by the original recipe) or any of the other stuff (garlic, bacon, etc).  The mushrooms were added to the pan, and the heat was turned up to full blast so that it could boil and reduce down.  At this point I also started a pot of white rice cooking, so that we could serve the chicken on top of that.


I let it boil for probably another 20 minutes, until the volume had reduced by approximately three quarters.


Then I removed the bay leaves, stirred in the butter....


....and added the chicken pieces back in to get re-warmed and coated in the sauce.


It was plated on top of a bed of rice, with a scoop or two of the mushroom-onion-bacon fortified sauce.


I have to say that at first, particularly as I was starting to reduce the sauce down, I though that maybe this recipe was too much trouble, and not worth all the effort.  But once we finally dove in and started eating it, I realized that I was wrong.  Very delicious!!

It only seemed complicated because it was my first time making this.  And it really didn't take very long (about an hour and a half start to finish).  I think I could easily do this one again, without even having to look at a recipe, now that I know the basic techniques involved in a classic Coq au Vin.

Sunday, September 30, 2012

Stuffed Pumpkin

It was a pumpkinpalooza of sorts on Facebook last week.  While one of our friends was harvesting oodles of them, another shared this recipe which of course we were quite inclined to try.  Today, a rare Sunday afternoon spent at home, was the day.


It took a bit of time (waiting while it baked), but was otherwise quite easy to do.  The house smelled fantastic and there is no doubt that the original recipe writers were correct to dub it "Pumpkin Stuffed with Everything Good."  I mean, there's bacon, and cheese! - need I say more?  For our version, I made some substitutions, and because the pumpkin I picked up turned out to be 6 pounds, I doubled everything....

INGREDIENTS
  • 1 pumpkin, about 6 pounds
  • Salt and freshly ground pepper
  • 3 rice cakes, chopped into chunks (based on the idea given in the original recipe of, instead of bread, using rice in general)
  • 1/2 pound Gruyere cheese, cubed
  • 8 garlic cloves, coarsely chopped
  • 8 strips of bacon, cooked until crisp, drained, and chopped
  • Dried chives (I used up all that we had left, probably a tablespoon and a half)
  • 1 tablespoon dried thyme
  • 2/3 cup heavy cream
  • Freshly grated nutmeg

PROCESS

1.  Preheat the oven to 350 degrees and line a baking sheet with Silpat (or parchment paper).

2.  Cut a cap out of the top of the pumpkin (think Halloween jack-o'-lantern).  Clean out the seeds and strings, season the inside of the pumpkin generously with salt and pepper, and put it on the baking sheet.


3.  Toss the rice cakes, cheese, garlic, bacon, and herbs together in a bowl. Season with pepper, and pack the mix into the pumpkin.


Obligatory bacon close-up because, well, it's bacon.


The pumpkin should be well filled.  You might have a little too much filling, or you might need to add to it.  I definitely could have used more filling, but since I had already depleted all of several of the ingredients I had on hand, I just left it as is.

4.  Stir the cream with the nutmeg and some salt and pepper and pour it into the pumpkin.


Again, you might have too much or too little — you don't want the ingredients to swim in cream, but you do want them nicely moistened. (Don't worry, it's hard to go wrong here.)

5.  Put the cap in place and bake the pumpkin for about 2 hours, or until everything inside the pumpkin is bubbling and the flesh of the pumpkin is tender enough to be pierced easily with the tip of a knife.  As the original recipe writers suggested, I removed the cap during the last 20 minutes or so, so that any excess moisture could bake away and the top of the stuffing could brown a little.


6.  When the pumpkin is ready, very carefully (it's heavy, hot, and wobbly) bring it to the table or transfer it to a platter that you'll bring to the table.

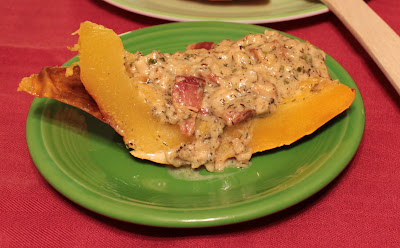
7.  Allow it to cool until the stuffing solidifies a bit, or if you're impatient like me, scoop all the stuffing out with a spoon into a separate container, slice the pumpkin into wedges, and serve it all up right away.


This was so, so, sooo good.  Bacon, cheese, cream, pumpkin, Autumn.  Yummy, yum yum.

We got 5 servings with stuffing, plus (because I didn't have/make enough stuffing to completely fill the pumpkin) leftovers of 2 slices of pumpkin and the pumpkin meat on the cap, from which I will make soup in the next few days.

Monday, February 6, 2012

Chocolate-Topped Peanut Butter-Bacon Bars

What did you make for Super Bowl Sunday?  We made a recipe that Hubby found on the Betty Crocker website: Chocolate-Topped Peanut Butter-Bacon Bars.  I don't know what exactly he was Googling for, but this is where he landed.  :)

Yes, you read it right.  Chocolate + Peanut Butter + Bacon.  Why not.  Believe it, they make a lovely combination....and bonus, this recipe is pretty darn easy to put together.
  

INGREDIENTS:
  • 1/3 cup vegetable oil
  • 2 tablespoons maple-flavored syrup
  • 1 egg
  • 10 slices bacon, crisply cooked, crumbled
  • 1/2 cup chopped peanuts
  • 1 cup semisweet chocolate chips

INSTRUCTIONS:
  1. Pre-heat oven to 350° and spray an 8-inch square pan with cooking spray.
  2. In a large bowl, stir together the cookie mix, oil, maple syrup and egg until a soft dough forms.
  3. Reserve 1/4 cup of the bacon for garnish.
  4. Stir the remaining bacon and peanuts into the dough and then press the dough evenly into the greased pan.
  5. Bake for 25 minutes or until golden brown.
  6. Remove from oven, sprinkle the chocolate chips over the top, and return it to the oven for 1 minute.
  7. Remove it from the oven and immediately spread the chocolate out over the top and then sprinkle the reserved 1/4 cup of bacon over the melted chocolate.
  8. Cool completely, about 1 hour or until chocolate is set, and then cut into squares of your desired size.
  9. Keep any leftover bars in the refrigerator (they do contain meat, after all).

REVIEW:

It's certainly an odd combination, and not one that many people would think of, but we liked these.  Of course, we are bacon fanatics and also love weird foods, but even the friends whose Super Bowl party we brought them to liked them (they ate 2 or 3 bars each, I think).  One even commented that it was a perfect combination of salty bacon and sweet peanut butter creaminess, and that the hardened chocolate gave just the right snap on top.  I personally didn't think that the peanut butter flavor came through strongly enough, and so if we make these again, perhaps I will add some actual peanut butter, or make the bars/brownies from scratch rather than using the bagged mix, so as to get a better flavor profile.

Thursday, December 15, 2011

Bacon Palooza!

Last night, Hubby and I went to Bacon Palooza at Olde Magoun’s Saloon.  It’s a local bar in the town where we grew up.  They do rotating specials menus, always based on some theme.  This month, it’s bacon!  Mmmmmm, bacon.

They are doing their bacon thing in the style of tapas (small plates), so of course, we ordered a bunch of things.  Here’s what we got (I apologize that these aren’t great pictures; I only had my cell phone in restaurant-bar lighting)....


Fig-alicious
(figs stuffed with goat cheese and wrapped in smoked applewood bacon)

(a close-up of the cut open fig dish)

Hog Wild Rangoon
(black pepper bacon, scallions and cream cheese stuffed in a wonton,
deep fried and served with a plum sauce)

Bacon Poutine
(waffle fries topped with crumbled bacon, cheese curds and
bacon onion gravy, topped with a soft egg)

Beef Bacon Blue
(mini beef filets stuffed with blue cheese and wrapped in bacon,
with caramelized onions and a pepper port reduction)

Chicken Fried Bacon
(battered and deep fried [Canadian] bacon, served with a bacon onion gravy, grits and two mini southern biscuits)

And finally, for dessert.... 


Praline Bacon Brownie
(it was chocolate cake on top of a chocolate chip cookie, sprinkled with what I think was walnuts and topped with a strip of candied bacon.  Served with homemade whipped cream)

Overall, I have to say that I was not too impressed with most of this.  Fig-alicious I really liked, and the Beef Bacon Blue was terrific.  But the rest, I give only a solid “meh.”  It could have been a lot better.  That’s okay, though, it won’t sway me from visiting this awesome local hangout in the future and tasting everything else they have to offer.  Their food is generally very good, and the other themed menus that they have done in the past were very nicely done indeed.  I still give the restaurant/bar two thumbs up.

Thursday, November 24, 2011

Three-Meat Beans

Today, in the spirit of love and giving thanks, I am going to share another family recipe.  This is a side dish that we learned from Jason's uncle Mark, and we make it every year for pre-Thanksgiving (Wednesday night) dinner at Jason's father's house.  Just like the 4 Layer Delight I posted recently, it's is a Southern thing....and so mouth watering.


INGREDIENTS
  • 5 slices of bacon
  • 1/2-pound of Kielbasa, cut into 1/4-inch slices
  • 1/2-pound of ground beef
  • 3 Tablespoons of chopped onions
  • 32-ounces of canned Pork & Beans (depending on where you live and what size cans of beans are sold in your store, this might be two cans, or it might be three cans -- just make sure you end up with somewhere near 32-ounces total)
  • 1/3-cup of ketchup
  • 1/4-cup of brown sugar
  • 2 Tablespoons of molasses
  • 1-1/2 teaspoons of Worcestershire sauce
  • 1-1/2 teaspoons of mustard

DIRECTIONS

1.  Pre-heat your oven to 350-degrees.

2.  Cook the bacon in a skillet; chop it up and set it aside in a large bowl (you will use this bowl later to mix everything together, so make sure it's a really big one).

3.  In the same skillet, brown the Kielbasa; remove from skillet into the large bowl, and discard the drippings.

4.  Add the beans, to the large bowl.


5.  In the same skillet, combine the onions and ground beef; cook, stirring, until the beef crumbles and is no longer pink. Dump the beef/onion mixture into the same large bowl.

6.  Add all the other ingredients to the bowl, and mix to combine.


7.  Pour it all into an oven-safe bean pot or baking dish, and bake (uncovered) for 30 minutes.


8.  Enjoy!