(Food is Love. Food is Culture. Food is Connection. Food is Adventure.)


Sunday, September 30, 2012

Stuffed Pumpkin

It was a pumpkinpalooza of sorts on Facebook last week.  While one of our friends was harvesting oodles of them, another shared this recipe which of course we were quite inclined to try.  Today, a rare Sunday afternoon spent at home, was the day.


It took a bit of time (waiting while it baked), but was otherwise quite easy to do.  The house smelled fantastic and there is no doubt that the original recipe writers were correct to dub it "Pumpkin Stuffed with Everything Good."  I mean, there's bacon, and cheese! - need I say more?  For our version, I made some substitutions, and because the pumpkin I picked up turned out to be 6 pounds, I doubled everything....

INGREDIENTS
  • 1 pumpkin, about 6 pounds
  • Salt and freshly ground pepper
  • 3 rice cakes, chopped into chunks (based on the idea given in the original recipe of, instead of bread, using rice in general)
  • 1/2 pound Gruyere cheese, cubed
  • 8 garlic cloves, coarsely chopped
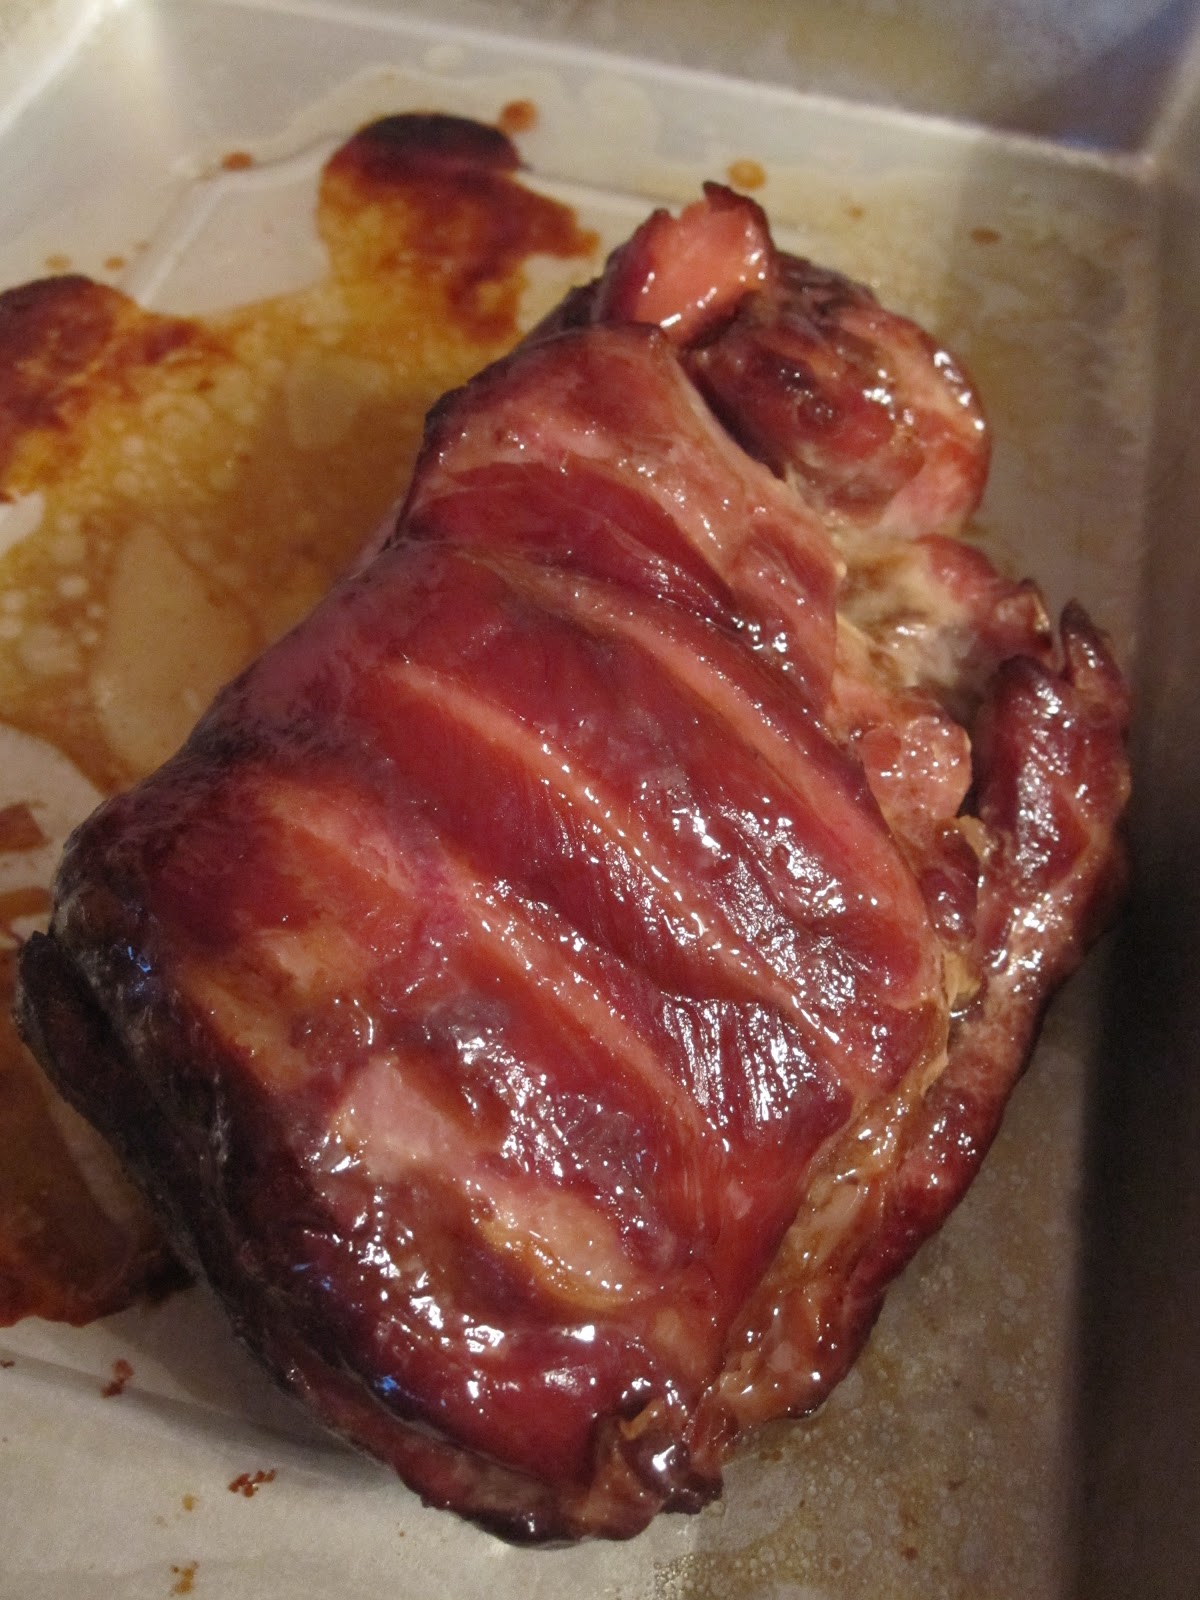
  • 8 strips of bacon, cooked until crisp, drained, and chopped
  • Dried chives (I used up all that we had left, probably a tablespoon and a half)
  • 1 tablespoon dried thyme
  • 2/3 cup heavy cream
  • Freshly grated nutmeg

PROCESS

1.  Preheat the oven to 350 degrees and line a baking sheet with Silpat (or parchment paper).

2.  Cut a cap out of the top of the pumpkin (think Halloween jack-o'-lantern).  Clean out the seeds and strings, season the inside of the pumpkin generously with salt and pepper, and put it on the baking sheet.


3.  Toss the rice cakes, cheese, garlic, bacon, and herbs together in a bowl. Season with pepper, and pack the mix into the pumpkin.


Obligatory bacon close-up because, well, it's bacon.


The pumpkin should be well filled.  You might have a little too much filling, or you might need to add to it.  I definitely could have used more filling, but since I had already depleted all of several of the ingredients I had on hand, I just left it as is.

4.  Stir the cream with the nutmeg and some salt and pepper and pour it into the pumpkin.


Again, you might have too much or too little — you don't want the ingredients to swim in cream, but you do want them nicely moistened. (Don't worry, it's hard to go wrong here.)

5.  Put the cap in place and bake the pumpkin for about 2 hours, or until everything inside the pumpkin is bubbling and the flesh of the pumpkin is tender enough to be pierced easily with the tip of a knife.  As the original recipe writers suggested, I removed the cap during the last 20 minutes or so, so that any excess moisture could bake away and the top of the stuffing could brown a little.


6.  When the pumpkin is ready, very carefully (it's heavy, hot, and wobbly) bring it to the table or transfer it to a platter that you'll bring to the table.

7.  Allow it to cool until the stuffing solidifies a bit, or if you're impatient like me, scoop all the stuffing out with a spoon into a separate container, slice the pumpkin into wedges, and serve it all up right away.


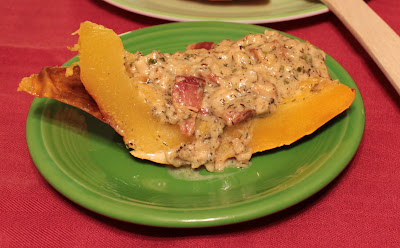
This was so, so, sooo good.  Bacon, cheese, cream, pumpkin, Autumn.  Yummy, yum yum.

We got 5 servings with stuffing, plus (because I didn't have/make enough stuffing to completely fill the pumpkin) leftovers of 2 slices of pumpkin and the pumpkin meat on the cap, from which I will make soup in the next few days.

Thursday, September 27, 2012

Sweet "Bread & Butter" Pickles

Oh, boy.  Oh, boy oh boy.  This post has been in the works for over a week because we had to wait for the product to ripen before we could taste test it.  And they are good!


We were moved to finally make our own homemade pickles (which we have been wanting to do for a long time now but just never got around to it) because we have a very generous neighbor who leaves bags of freshly grown and picked produce on our door at least once every couple of weeks throughout the summer.  Case in point, we still have three gallon-size Ziploc bags of green beans in the freezer.  Yum.  He apparently grew a LOT of green beans this year.  :)  Anyways, there were also a lot of cucumbers -- too many for us to eat before they went bad.  So....pickle time!!!

We searched the Interwebs for recipes, and surprise, surprise, settled on one from our favorite wacky mad-scientist chef: Alton Brown.  It's called Ab's B and B's, which of course we amended given the ingredients that we had on hand when we finally got to work.  For example, we didn't have Pickling Spice, so we Googled to find out what the various mixes would contain, and then concocted our own from there.

Here's how we did it....

INGREDIENTS
  • 2 medium cucumbers, thinly sliced (I couldn't say exactly how many or how much we actually used -- we just chopped some of the cucumbers that we had until we were satisfied that it was enough to mostly fill the jars that we were going to use)
  • 1/2 onion, thinly sliced
  • Garlic cloves (however many you like - we like more than the "norm")
  • 1 cup water
  • 1 cup apple cider vinegar
  • 1 1/2 cups sugar
  • A pinch of kosher salt
  • Bay leaves - 4
  • Whole Cloves (see picture below for how much - we didn't measure)
  • Whole black peppercorns (see picture below for how much - we didn't measure)
  • Juniper berries (see picture below for how much - we didn't measure)
  • Cinnamon Sticks - I think we used 2 or 3, broken into pieces


PROCESS

1.  Combine the liquids (water and apple cider vinegar), the sugar, and all spices in a pot.  Bring it to a boil, then allow it to simmer for about five minutes to "wake up" the flavors of the spices.

2.  Meanwhile, slice up your cucumbers and onions.


3.  Transfer the cooked pickling liquid (spices and all) to a container with a spout (such as a large measuring cup or a pitcher) for easy pouring.  Fill your jars with alternating layers of cucumbers and onions, with a garlic clove thrown in here and there.  Then slowly pour the still hot pickling liquid (spices and all) into each jar until everything is covered.


4.  When the liquid is cooled, cover your jars and pop them into the refrigerator.  (By the way, you could be using screw top jars, spring-top jars, or whatever kind of jars you like or have on hand -- you can see that we are using old salsa jars.)


5.  This is the hard part -- Wait a whole week.  (I took it upon myself to shake about the jars every few days, to make sure all the cucumber and onion slices were still completely submerged in the liquid, and that the spices were distributed all around and not clumped in any one area.  This step wasn't in the recipe we worked from, so I doubt it's really necessary.  But I got to feel like I was doing something and helping the process along.)

6.  Finally, after you have waited the prescribed amount of time, bust open those jars and munch.


Your pickles will keep for a couple of months in the refrigerator.


THE REVIEW

I was surprised by how much sugar there was in this recipe, so much so that I even ask Hubby if he had forgotten to dump it in the pan (I didn't think that much sugar would have dissolved so quickly and easily).  But they are, after all, sweet pickles.  And have to say, for essentially winging it on the spices, they came out delicious.  We will most certainly be making out own pickles again, if not every time, from now on.  I mean, really, which ones here look better and would you prefer (plus contain no preservatives or other nonsense)?


Monday, September 10, 2012

Real New England BBQ

Real New England BBQ?  Yes, I said "New England" BBQ, because that's where we live.  ;)

We are big BBQ fans -- which in case you don't know is not the same as "cooking out."  Texas, Carolina, Memphis, Kansas City, you name it.  It's all good.  And while there are a slight few worthy restaurants near us for this type of food, it's still hard....very hard....to find good BBQ around us.  So, why not make our own, right?

What we have for you in today's third foodventure installment (can you tell it's a catch up day on the blog?) is yet another Alton Brown recipe.  He calls it AB-BQ, and while it's time consuming, it's easy peasy.  Here's how we did it (of course we didn't stick exactly to the recipe)....

YOU WILL NEED:
  • 3 quarts water
  • 12 ounces kosher salt
  • 8 ounces  molasses
  • 8-10 pound boneless pork butt (We only used about 3 pounds, because we're only 2 people and also that's the size we found at our local supermarket)
  • Special Equipment:  A smoker and 4 ounces of hickory or oak wood chunks

WHAT YOU WILL DO:

1.  Place the water, salt, and molasses in a large container and stir until the salt dissolves.  Add the pork butt to the brine and weigh it down to make sure it is completely submerged.  Alton suggests filling a zip top bag with 2 cups of the brine and laying it on top of the pork to accomplish this, but we opted instead to lay a couple of small plates on top of the pork -- works just as well.

2.  Cover and refrigerate overnight.  Remove the pork from the brine, and pat dry.

3.  Heat your smoker to around 225 degrees F.  Add the wood chunks, and place the pork into the smoker.  AB's recipe didn't call for it, but since our smoker has a separate tray for liquid, Hubby filled it mostly with water and then added a 12-ounce can of Coke to the water.  In it went to the smoker.

4.  Cook until the pork reaches an internal temperature of 150 degrees F, or 4 to 5 hours.  We didn't use a thermometer, and since our pork butt was a lot smaller than what AB's recipe calls for, we just smoked it for four hours.  Note: you may need to add more charcoal or wood chips throughout the process, depending on how long you soaked your chips, the temperature outside, and how fast things burn off.

5.  A bit before you go to take the meat out of the smoker, heat your oven to 300 degrees F.  Wrap the pork in aluminum foil and transfer to a pan with high enough sides to catch any drippings (we don't want no messes in the oven, now do we?).  Place on the center rack and cook until the pork reaches an internal temperature of at least 200 degrees F, anywhere from 3 to 5 hours.

6.  Remove from the oven and rest, covered for 30 minutes before serving, pulling, or otherwise messing with it.  This is what ours looked like after resting:

Dayam, right?
 
Look at that caramelization!  Mmmmmm.

And the smoke ring.  Ooooooh!

7.  Use two forks to pull the pork apart.


So.  freaking.  good.  We served it with garlic-chive mashed potatoes, buttered corn, and a sliced garden fresh tomato.  The sauce that you see on top here was whipped together by Hubby.  Unfortunately, like most of his rubs and sauces, no measurements were done, but we can tell you that it contains ketchup, molasses, Worcestershire sauce, tamari (that's gluten free soy sauce), garlic powder, apple cider vinegar, salt and pepper, and that he cooked it on the stove to reduce it to a desired consistency.  No worries, though, sauces are a personal thing and you should make yours (if you even want one) to your own liking.

Tarts that Pop (Strawberry Habanero Toaster Pastries)

As I mentioned in my post earlier today about the Southern Vermont Garlic Festival, we recently picked up several varieties of spicy jam made by Jamtastic! of Rupert, VT.  One of them was a strawberry habanero jam that was fantastically tasty -- hot, sweet, and (bonus) containing only essential natural ingredients.


Not even two days after getting home from the festival, I received an email from Hubby stating "OMG we have to make these with the habanero strawberry jam."

Who am I to turn down such a great idea using an Alton Brown recipe?  No one, that's who.

So we made the homemade toaster pastries last night, and can now likely add Pop Tarts to the list of packaged foods we will never again buy (not that we purchase them any more than extremely rarely anyways -- but now we can have them at home, all natural, with no preservatives, and made from scratch!!).

We followed the recipe pretty much exactly as given on AB's website, and I do have a couple of adjustments that I will make next time.  I will note those as I go along, but basically, it's like this....

INGREDIENTS (all ounce measurements are of course by weight, not volume):
  • 22 ounces all-purpose flour
  • 2 teaspoons baking powder
  • 1/2 teaspoon salt
  • 8 ounces sugar
  • 6 ounces vegetable shortening
  • 2 large eggs
  • 1/4 cup milk
  • 1 teaspoon vanilla
  • 1/2 cup jam, fruit butter, or preserves
  • For Egg Wash: 1 large egg plus 2 tablespoons of milk

INSTRUCTIONS:

1.  Whisk together the flour, baking powder, and salt in a medium bowl.  Set aside.

2.  In the bowl of a stand mixer fitted with the paddle attachment, cream together the sugar and vegetable shortening on medium speed until light, scraping down the sides as needed.

3.  Reduce the speed to low and add the eggs one at a time. Again, stop and scrape down the sides of the bowl as needed.

4.  Add the flour in three installments, alternating with three installments of the milk.  Add the vanilla with the last milk installment.

5.  Form the dough into a log and place width-wise onto a piece of parchment paper and fold over the paper.  Using a half sheet pan as wedge, roll the dough into a log.  This procedure tightens the log into a clean cylinder.  Remove the waxed paper and slice the dough into 16 rounds.  Place the rounds on a sheet pan, cover, and chill for at least 1 hour.

6.  Set two racks in the middle of the oven and heat to 350˚F.

7.  After the dough has chilled, roll each round out to a 5 - 6" circle in between two sheets of parchment paper.  Fold over the edges of each round to create a rectangle, then roll out the rectangle to about 1/4 inch thickness.  Repeat with remaining rounds.


(I think it's worth clarifying here that all the rounds should remain in the fridge and only the one or two that you are currently working with should be taken out -- in other words, take them out of the fridge one or two at a time, not all at once.  With the oven on and it being a warm day, the shortening softened up pretty quickly, making the dough sticky, too pliable and inadvertent holes got made in the dough that required patching.  Second, the whole rolling, folding, and rolling again process was time consuming, again leading to the dough that wasn't refrigerated softening and needing to be re-refrigerated before we could continue.  So I wonder if there's any reason why the entire dough log can't be treated like sugar cookie dough, using a really large square cookie cutter, or a even a bowl -- there ain't nothing wrong with round toaster pastries, right? -- to make the process faster and also ensure that the two sides of the pastry will be exactly matching in size?  I see no reason why not.)

8.  Now match up the 16 rounds into 8 matching pairs.  Brush one rectangle with the egg wash and top with 1 tablespoon of jam, fruit butter or preserves (obviously we used the strawberry habanero jam), spread into an even layer about 1/2 inch from the edge, and top with another pastry rectangle.  Use a fork to seal the tart by pressing the tines long the edge, and gently dock the top of the tart with the fork.


(We ended up with pairs that didn't really match exactly or perfectly, and had to trim little bits off the edges here and there -- see my note about about using cookie cutters or a bowl for uniformity.)

9.  Repeat with remaining dough and filling.

10.  Bake for 25 minutes on a parchment paper lined sheet pan (we used Silpat instead) until the edges are just beginning to brown.

11.  Cool on a rack , while you  make the icing.


(You may have noticed that there are only 7 pastries here, rather than the 8 that the recipe should yield.  Because of the refrigeration/dough softening problem mentioned above, we had one casualty that never even made it into the oven.)

12.  In a small bowl slowly whisk together 4 ounces of confectioner’s sugar and 2 tablespoons milk (you can adjust the amounts of milk and sugar to your liking, for flavor and consistency), then paint/spread on the front of the tarts.


13.  Allow to dry before stacking, storing, or freezing.


These were delicious.  What else can I possibly say?  And the recipe is super-versatile, because you can fill/frost the pastries with whatever you choose, or even make them any shape or size you want.  Even with following the recipe exactly -- i.e. not making the adjustments mentioned above (which we will do next time) to make the process faster, easier and more efficient, this was well worth it.  Oh how we heart our AB!

Garlic, Garlic, and more Garlic

A couple years ago, we were originally planning to take a vacation and drive across the country to the Gilroy Garlic Festival in California.  Finances, new jobs, and lack of vacation time, etc. caused that particular adventure remain on our "to do someday" list, and we instead decided to check out a more local event.  So, last weekend, we finally made a trip to the annual Southern Vermont Garlic & Herb Festival in Bennington, VT.

We knew that it wouldn't be anything like what goes on in Gilroy, and that's quite okay.  Bennington, VT, after all, isn't the "garlic capital of the world" that Gilroy is  ;)  What we experienced was in most ways exactly what we expected  and definitely worth the modest admission fee, but in one aspect a tad disappointing.  Here's the scoop....

Guided by volunteers wearing garlic hats and waving pool noodles (cute touch), we parked our car on the huge grassy field, and proceeded to the gates where we paid the $5 each to enter.  In exchange, we received neat-o hand stamps:


Seriously, I thought the stamp was cool.  I'm an oddball, whatever.  =P

As advertised, there was everything from garlic ice cream to garlic jelly, pickled garlic, roasted garlic, garlic braids, and, of course, plain garlic bulbs of every variety for sampling and purchase.  There was even a vendor making garlic lemonade (which unfortunately we not get to try).  There were demonstrations happening throughout the day (braiding, planting, a Home Depot kids workshop, etc), but we didn't get involved in that particular stuff.  There were also plenty of non-garlic-centric items available for sample and/or purchase -- such as arts & crafts, foods & beverage products, and even one vendor selling Vitamix blenders.  Essentially, it was like a giant farmers' market, with if I am remembering correctly, at least 10 long rows of tents all set up selling their various wares.  Being that it's Vermont, there were also lots of maple-based items.  There was a separate section where you could buy freshly prepared food, and in that same area was a band playing and a hay maze for the kiddos.  Finally, there was an absolutely huge and very, very interesting antique store on the grounds - I think they own the land on which the festival took place.  We spent a good amount of time browsing in there.

Anyways, we walked around most of the festival grounds, sampling things here and there, before making decisions and going back to purchase stuff.  We tried....

Various garlic and other oils and dips.  All very delicious.

Garlic fudge.  Quite interesting.

Black Garlic Chocolate Chip Shortbread Cookies.  We got the second to last bag of them.
They weren't bad at all, and the garlic seemed to give them a very moist, creamy texture.

Roasted Garlic Ice Cream.  Look, you can see the bits of garlic in there.
It was tasty, and I would absolutely eat this again.  It kind of reminded me of
one of the Tastefully Simply dips.  Weird, I know.  But it really was unexpectedly good.

And the be all and end all of stuff we sampled that day -- Deep Fried Garlic Cloves!!!
Oh.  My.  God.  So.  Awesome.  'Nuff.  Said.
I had expected them to be breaded or battered before, but they weren't, and it wasn't necessary at all.
Imagine, though, if they were?  Wow.  Maybe that will have to be an at-home foodventure sometime.

We tasted lots of other stuff, too, but just couldn't take pictures of it all.

Around noontime, we moseyed on over to the prepared foods/hay maze/band area and got lunch.  This, as I mentioned above, is where the disappointment of the day came into play.  I would have expected the things that people were cooking and selling here to be more, I don't know, special?  Some examples of things that were being served, but that I thought were too common, were garlic naan at the Indian food vendor, garlic sausages, and the thing I ordered and was not happy with: a garlic hamburger, which amounted to nothing more than a hamburger with some garlic slapped on top as if it were relish.  Boooo.  Definitely not Gilroy.

Overall, it was a nice time and I am glad that we went, but I see no need to make the three and a half hour drive to attend this event again.  Ironically, even though we are huge garlic fans and very much enjoyed the garlic-y treats that we sampled that day, nothing that we bought to take home (for ourselves) was garlic.  We bought a bottle of maple liqueur (soooo good), a jar of strawberry habanero jelly (wait until you see what we did with that last night!), two other jars of jelly from that same vendor, spicy pickles for a friend, fudge (normal, not garlic) for another friend, and a garlic sampler for a third friend.  I also went back to one craftsman to pick up a wicked cool steampunk-ish pepper grinder that I spotted earlier in the day, but by the time I got there, it was gone.  Oh, well.  In the end, the shopping bag ended up pleasantly heavy with our spoils.  :)