(Food is Love. Food is Culture. Food is Connection. Food is Adventure.)


Monday, November 14, 2022

Thai Mango & Carrot Soup (Vegan, Gluten-Free)

We're using up freezer-stash Mango today.  Here's what happened --


INGREDIENTS*
* Things that are grouped by color in my ingredient lists can be measured out into bowls together while getting your Mise en Place, to streamline your process as well as minimize the number of things you'll have to clean later. Anything left white/un-highlighted should be kept separate by itself.
  • 2 Tablespoons Olive Oil
  • 1 medium-to-large Onion (chopped)
  • 5 cloves Garlic (roughly chopped)
  • 1 thumb-sized piece of Ginger (peeled with a spoon, and minced)
  • 4 medium-to-large Carrots (cut into rounds)
  • 1 Red Bird’s Eye Chili (roughly chopped)
  • 1 stalk of Lemongrass (cut into segments short enough to fit into your pot but large enough that you will be able to easily find them later)
  • 3 Mangoes (peeled, flesh removed from core, and chopped)....or ~4 cups frozen mango chunks
  • 1 teaspoon Ground Cinnamon
  • 2 teaspoons Ground Coriander
  • 2 teaspoons Ground Cumin
  • A few fresh grates of Nutmeg
  • 2 teaspoons Kosher Salt
  • 1 teaspoon freshly ground White Pepper
  • 4 cups Vegetable Broth
  • 8 Makrut Lime Leaves (bruised)
  • 1 can of lite Coconut Milk
INSTRUCTIONS:
  1. Heat the oil in a medium-to-large pot, and then sauté the onion, garlic, ginger, carrots, chili, and lemongrass over high heat until the onions just start to take on some brown color.
  2. Add in about 2/3 of the mango and all the spices, and cook on high heat for just a few minutes to develop those flavors – then tip in the vegetable broth, toss in the lime leaves, and bring it to a boil. Reduce the heat, cover, and let it all simmer together for about 20 minutes or until the carrots are soft.
  3. Remove the lemongrass and lime leaves from the pot and toss in the rest of the mango and the coconut milk.
  4. Using a stick/immersion blender, work the soup until it’s completely smooth. (Alternatively, you can accomplish this process in a regular blender – you’ll just have to pour the soup back into the pot afterwards.)
  5. Return the lemongrass and lime leaves to the pot, and bring it all back up to temperature -- tasting and adjusting any spices you wish as you go.
  6. Serve with an optional garnish of fresh cilantro, maybe a tiny sprinkle of extra nutmeg, or even some additional chilies if you're feeling spicy. (The lemongrass and lime leaves aren't meant to be eaten – but if you really, really want to….)
NOTES:
  • I leave the Lemongrass and Lime Leaves in the soup as it sits, so they can continue infusing their flavor -- even when storing any leftovers.
  • The soup will likely get a little spicier the longer you store leftovers in the fridge or otherwise, as the Bird's Eye Chili will also keep doing its thing.

This post is an original recipe that I created from scratch.

My goal is to share my love of food simply -- without all the fluff (unless it's Marshmallow Fluff!), long winded stories, excessive and repetitive photos, or incessant rambling that I see on other blogs.  I personally tend to skip over all that, just scrolling straight to the bottom in hopes of finding the recipe right away.  Therefore, I hope you appreciate the brevity above.

** You'll also never find ads here. **

If you have any questions or comments, please leave them below or
contact me directly using the form near the top of the right-hand column.

Wednesday, October 5, 2022

Vegan & Gluten-Free Tomato Soup (Basil, or Curried)

Did you know that Campbell's Condensed Tomato Soup has wheat in it?  I didn't.  (I kind of wonder if the presence of wheat was always the the case .... because I wouldn't have used the soup for the purpose I did had I been aware before.)  Hmmmm.  But I certainly could have just made a mistake or overlooked it.  Yikes!

Anyways, the problem wasn't brought to my attention until we were in the middle of making a batch of soup for almost 200 people (which was supposed to be both Vegan and Gluten-Free) at Burning Man this year .... when one of my staff noticed the ingredient that truly has no business being there.  Luckily, it was early enough in our process that we could pivot and make a separate smaller pot of actually Gluten-Free soup for the people who needed it, and continued on with the criminal (but still Vegan) version for everyone else.

All of this left me wanting to figure out a new Tomato Soup recipe, because if I don't have to make separate or additional pots for dietary restrictions -- i.e. if I can use one recipe that serves everyone's needs -- that's what I want to do.  So, here's the recipe I wrote and tested over the past few days (including flavor variations).  Both are super quick and easy.

TOMATO-BASIL SOUP (Vegan and Gluten-Free)

Ingredients:
  • Four 6-ounce or Two 12-ounce cans of Tomato Paste
  • 16 fluid ounces (2 cups) of Coconut Milk
  • 16 fluid ounces (2 cups) of Almond Milk
  • Two 14.5-ounce cans of (Fire-Roasted if you can find them) Diced Tomatoes
  • 2 teaspoons of (Penzeys Roasted, if you can get it) Garlic Powder
  • 2 teaspoons of Onion Powder
  • 2 teaspoons of Dried Basil
  • 2 teaspoons of Paprika
  • 2 teaspoons of Dried Oregano
  • 2 teaspoons of Dried Parsley
  • 2 teaspoons of Kosher Salt (you'll probably want to use less if your Tomato Paste already has salt in it)
  • 2 teaspoons of freshly-cracked Black Pepper
Directions:
  1. Combine all ingredients in a sauce pot.
  2. Whisk together until the Tomato Paste and Coconut Milk smooth out.
  3. Simmer (whisking occasionally) until you're ready to serve (but at least 30 minutes so all the flavors have time to marry well).
Notes:
You can also throw in some chiffonaded fresh basil for an additional pop of crispness.
Makes 8 cups.


CURRIED TOMATO SOUP (Vegan and Gluten-Free)

Ingredients:
  • Four 6-ounce or Two 12-ounce cans of Tomato Paste
  • 16 fluid ounces (2 cups) of Coconut Milk
  • 16 fluid ounces (2 cups) of Almond Milk
  • Two 14.5-ounce cans of (Fire-Roasted if you can find them) Diced Tomatoes
  • 6 teaspoons of Kosher Salt (you'll probably want to use less if your Tomato Paste already has salt in it)
  • 8 teaspoons of Penzeys Salt-Free Sweet Curry Powder; or whatever Curry Powder you have and like (just be aware if yours already has salt in it - Penzeys doesn't - that you may want to reduce the amount of Kosher Salt that you add.)
Directions:
  1. Combine all ingredients in a sauce pot.
  2. Whisk together until the Tomato Paste and Coconut Milk smooth out.
  3. Simmer (whisking occasionally) until you're ready to serve (but at least 30 minutes so all the flavors have time to marry well).
  4. Garnish with a little sprinkle of extra Curry Powder.
Notes:
Makes 8 cups.

This post is an original recipe that I created from scratch.

My goal is to share my love of food simply -- without all the fluff (unless it's Marshmallow Fluff!), long winded stories, excessive and repetitive photos, or incessant rambling that I see on other blogs.  I personally tend to skip over all that, just scrolling straight to the bottom in hopes of finding the recipe right away.  Therefore, I hope you appreciate the brevity above.

** You'll also never find ads here. **

If you have any questions or comments, please leave them below or
contact me directly using the form near the top of the right-hand column.

Saturday, September 24, 2022

Vegan Pesto

I had a bunch of fresh Basil and Parsley lying around, extra after using what I needed for other recipes -- so I decided to make some Pesto to be used at our next potluck dinner.  Here it is....

INGREDIENTS:

  • 1 batch of my Vegan "Grated Parmesan Cheese" (Note: I used Almonds this time because I was out of Cashews, and it turned out just as well.)
  • 2 loosely packed cups of Fresh Basil Leaves
  • 2 loosely packed cups of Fresh Italian (i.e. flat leaf) Parsley
  • 4 large cloves of Garlic, crushed
  • 1/4 teaspoon of freshly cracked Black Pepper
  • 1 cup of Olive Oil (I happen to have Extra Virgin)

DIRECTIONS:

  1. Put everything except the Olive Oil into a food processor and pulse to combine;
  2. Then, while running the machine, drizzle in the Olive Oil until your Pesto is fully formed -- about a minute or so.
  3. Serve it as a sauce on pasta or potatoes, spread it onto bread, use it as a veggie dip, stir a dollop into soup, etc.  Or, like me today, just freeze it for later.  The possibilities are endless!

This post is an original recipe that I created from scratch.

My goal is to share my love of food simply -- without all the fluff (unless it's Marshmallow Fluff!), long winded stories, excessive and repetitive photos, or incessant rambling that I see on other blogs.  I personally tend to skip over all that, just scrolling straight to the bottom in hopes of finding the recipe right away.  Therefore, I hope you appreciate the brevity above.

** You'll also never find ads here. **

If you have any questions or comments, please leave them below or
contact me directly using the form near the top of the right-hand column.

Wednesday, March 23, 2022

Crispy St. Patrick's Day Corned Beef Dinner Dumplings

After a two-year pandemic break, my employer last week once again served the traditional St. Patrick's Day luncheon. Our caterer is fantastic and makes, hands-down, the best corned beef I've ever had.  As per usual, however, there were a lot of leftovers....and office policy is that the fridge gets cleaned out and all food thrown away every Friday around 4:00 PM.  But I wasn't going to let all that stuff go to waste.  You can see from my Instagram post what I took home, what I already did with some of it, and what I plan to create with the rest.  This is one of the things I made and brought to our weekly potluck last night: 


Since this was a "create as I go" endeavour, I'm not giving a formal ingredient list this time, but have instead highlighted in bold green below each ingredient as I used it.

So, to make them -- chop up leftover Corned Beef, leftover Carrots, and leftover Potatoes; then make a small pile of those ingredients in the middle of some wonton wrappers (I finally used up the rest of our wonton wrappers that I've had in the freezer for a while now here, too!).  On top, put a small dollop of Whole Grain Mustard.


Then roll them up like tiny burritos to make bite-size packets, using an Egg Wash (egg mixed with a little water) to seal them closed.


Plop them, seal-side down, onto a baking tray covered with aluminum foil and greased with cooking spray.  I also sprayed the dumplings on top to help with browning and crisping.  My unfrozen, test batch were ready (golden brown and crispy) after about 10 minutes in a 375°F oven.  (The rest that we took to the potluck were cooked from frozen, and so took about twice as long.)  Serve with your favorite gravy (stout or otherwise) as a dipping sauce.

This post is an original recipe that I created from scratch.

My goal is to share my love of food simply -- without all the fluff (unless it's Marshmallow Fluff!), long winded stories, excessive and repetitive photos, or incessant rambling that I see on other blogs.  I personally tend to skip over all that, just scrolling straight to the bottom in hopes of finding the recipe right away.  Therefore, I hope you appreciate the brevity above.

** You'll also never find ads here. **

If you have any questions or comments, please leave them below or
contact me directly using the form near the top of the right-hand column.

Sunday, March 20, 2022

Spicy Pan-Fried Sesame-Lime-Coconut Tofu

A friend posted that they had made this recipe a while back, and it looked tasty and intriguing -- so I also wanted to try it.  As I was starting to put it together, though, I decided to make some modifications.  This is my revised version of the original:


Note -- Things that are grouped by color in my ingredient lists can be measured out into bowls together while getting your Mise en Place, to streamline your process as well as minimize the number of things you'll have to clean later. Anything left white/un-highlighted should be kept separate by itself.

INGREDIENTS:
  • ¼ cup of Coconut Milk
  • The Zest and Juice of 2 Limes
  • 2 Tablespoons of Sambal Oelek
  • 1 Tablespoon of Light Brown Sugar
  • ¼ cup of Sesame Oil
  • a pinch of Kosher Salt
  • 10 twists of freshly cracked White Pepper
  • 1 package (mine was 14 ounces) of Extra Firm Tofu (pressed to reduce moisture, then cut into about 14 or so pieces)
  • ½ cup Panko Bread Crumbs
  • 2 Tablespoons of Sesame Seeds (I used a mix of black and white)
  • 2 Tablespoons of shredded Coconut, very lightly toasted
  • ½ teaspoon of freshly cracked White Pepper
  • a pinch of Kosher Salt
  • 1 large Egg
  • enough neutral oil to fill your skillet about 1/8" (I keep Safflower on hand)
  • fresh Chives, chopped
DIRECTIONS:
  1. Whisk all the marinade ingredients together (highlighted red above) until emulsified.
  2. Place the Tofu slices in a shallow pan or dish, and pour the marinade over.  Refrigerate for anywhere from 30 minutes to several hours (it happens to be Sunday, so I had time to start early -- and marinated mine for about 3 hours).  Flip the slices over halfway through whatever your marinating time is.
  3. When you're ready to cook, mix all the breading ingredients together (highlighted orange above) in a shallow bowl.  In a separate shallow bowl, whisk the Egg.
  4. Heat the Neutral Oil in a skillet or other shallow pan.
  5. Shake off excess marinade; and gently dip each piece of Tofu into the Egg, then dredge in the Sesame-Seed/Coconut Panko mixture, and then pan-fry them (aiming to maintain the oil at medium-high heat) for several minutes on each side, or until golden brown and crispy on the outside.  Drain on paper towels.
  6. In a separate, small pan -- heat and whisk the extra marinade to form a finishing sauce.
  7. Serve with your choice of rice, vegetables, and/or noodles.  (I went with Baby Spinach sauteed with Shallots, Salt, and Pepper; plus some Baby Carrots leftover from another meal).  Drizzle a spoonful or two of the sauce on top of the Tofu; and sprinkle the finished plate with some Chopped Chives and, if desired, additional Sesame Seeds.

This post is a semi-original recipe that I adapted from Nik Sharma's.

My goal is to share my love of food simply -- without all the fluff (unless it's Marshmallow Fluff!), long winded stories, excessive and repetitive photos, or incessant rambling that I see on other blogs.  I personally tend to skip over all that, just scrolling straight to the bottom in hopes of finding the recipe right away.  Therefore, I hope you appreciate the brevity above.

** You'll also never find ads here. **

If you have any questions or comments, please leave them below or
contact me directly using the form near the top of the right-hand column.

Monday, March 14, 2022

Around the World in Foodventures (Azerbaijan, redux: KUFTA BOZBASH)

There was another Azerbaijani recipe that caught my eye, which I would have preferred to cook at the same time as the Shorgoghal and do one post with both together-- except I didn't feel like hunting down its special ingredient before. But now I have it (thanks to the kindness of Feride Buyuran who quickly responded to my inquiry via her website asking for good sources), and made the thing for dinner tonight....so here is a rare second post for a country I've already foodventured to --


Note -- Things that are grouped by color in my ingredient lists can be measured out into bowls together while getting your Mise en Place, to streamline your process as well as minimize the number of things you'll have to clean later. Anything left white/un-highlighted should be kept separate by itself.

INGREDIENTS:
  • 1/2 pound of Ground Beef
  • 1/2 pound Ground Lamb
  • 1 medium-to-large Onion, very finely minced or grated
  • 1 large Egg
  • 1/4 cup of medium-grain White Rice, rinsed
  • 1 - 2 teaspoons of minced Fresh Mint (to your preference)
  • 1 teaspoon of Dried Savory Leaves
  • 1 teaspoon Crushed Dried Basil
  • 1 teaspoon of Salt
  • 1/4 teaspoon of Freshly Ground Black Pepper
  • 4 dried Cherry-Plums*
  • 2 Tablespoons of Clarified Butter or Ghee
  • 1 Tablespoon of Tomato Paste
  • 4 cups of Beef Broth
  • 3 cups of Water
  • 4 medium Potatoes (I am using a mix of red and white ones)
  • 1/4 teaspoon of Turmeric
  • 1 cup canned Chickpeas, drained and rinsed
  • 4 Roma Tomatoes, whole
  • 1/2 cup of Green Peas (frozen or raw)
  • Additional Fresh Mint, Salt & Pepper (for garnish)
* I purchased some "Aloo Bukhara Sour Plum - Aloocheh" from Persian Basket.  They still had their pits in them, and I was mistaken to think I would be able to remove those pits before cooking.  They were very, very difficult (if not impossible) to get out -- so I just used them with the pits left in and was mindful of that while eating.  You may want to opt for a Cherry-Plum variety that was pitted before being dried.

DIRECTIONS:
  1. To make the meatballs, combine the Ground Beef, Ground Lamb, Onion, Egg, White Rice, Mint, Savory, Basil, Salt, and Pepper.  Mix very thoroughly, until it starts to become pasty.  Then divide the mixture into 4 and shape into balls.  Make a hole in each one and place one dried Cherry-Plum into the center and re-close the meat around it.  Pack the meatballs hard so they hold together while cooking.
  2. To make the soup -- in a large pot, briefly cook the Tomato Paste in the Clarified Butter or Ghee.  Pour in the Beef Broth and the Water.  Bring it to a boil.
  3. Reduce the heat to medium-low and gently drop in the meatballs.  Cook for 10 minutes, skimming off any froth that gathers on the surface.
  4. Now add the whole Potatoes and the Turmeric, and season with additional Salt & Pepper to taste.  Continue cooking on a low-to-medium boil for another 20 minutes.
  5. Add the Chickpeas, the Tomatoes, and the Green Peas -- and cook for 10 more minutes.  Check that the potatoes are cooked through by poking with a fork, and use a thermometer to make sure the meatballs are done (they should reach 160°F in the center). If things need to cook more, do so until the meatballs reach a safe temperature and the potatoes are soft to your liking.
  6. To serve, put one Meatball, one Potato, and one Tomato into each bowl (my potatoes were probably bigger than they should have been, so I cut them in half before serving); then ladle over some of the broth along with Chickpeas and Green Peas.  Garnish each bowl with additional Mint, and Salt & Pepper to taste.
This was pretty yummy, and I especially enjoyed the little pop of tartness at the center of each meatball.  I'd happily make it again -- except next time I would make the meatballs smaller so that I could get that delightful taste of Cherry-Plum in every bite instead of only with the very center portion.  I see no reason why the potatoes and tomatoes couldn't be smaller to match the meatballs, too (for example, using cherry tomatoes and those bags of "new/baby" potatoes you find in the supermarkets).

I studied several web pages (see: 1, 2, 3, 4, and 5) -- then used a combination of them plus personal knowledge and experience to write my own recipe that you see above.

This post is part of my project: "Around the World in Foodventures" (I decided I want to expand my culinary horizons even further by making the national dish or a popular recipe, or some signature food or traditional meal from every country in the world. Maybe it'll happen alphabetically, or by region, in random order, or something else. I figure if we can't (yet?) travel everywhere, we at least have the luxury of being able to taste it. It’ll be fun and interesting, but obviously, will take a long time to get through -- as I'll only be doing it once a week or so at most. I am chronicling the journey here.)

“If I’m an advocate of anything, it’s to move…Walk in someone else’s shoes or at least eat their food.” --Tony Bourdain

Wednesday, February 16, 2022

Elizabeth Ingram's Quarantine Quitchen Kale Caesar Salad

This isn’t my recipe, but I wanted to post it here because it’s SPECTACULAR and I feel compelled to preserve it for future reference. (I sure as heck know I'm gonna want to revisit it time and time again.)

It was made up 100% on the fly by Elizabeth Ingram during an episode of Quarantine Quitchen on July 13, 2021. We just happened to have extra of one of the relatively specialized ingredients lying around (Bottarga), with no particular plans for finishing it off -- so we decided to procure the rest of the ingredients and make the salad ourselves.  Boy are we glad we did! This is, hands down, the Caesar salad that all Caesar salads wish they could be.


Combine the following things in a bowl and whisk together until they become salad dressing:
  • 2 small Garlic Cloves, minced
  • 1/3 - 1/2 cup grated* Manchego Cheese
  • ¾ - 1 teaspoon Cumin
  • ¾ - 1 teaspoon Aleppo Pepper
  • ¾ - 1 teaspoon Smoked Sea Salt
  • ¼ teaspoon Sumac
  • 1.5 Tablespoons Lemon Juice
  • 1/3-1/2 cup Olive Oil
  • Bottarga, grated* (I probably used about 3/4" of it; 3-4 Tablespoons)
*I use a microplane for grating.

Toss the dressing with torn Lacinato (“Dinosaur”) Kale leaves, and prepare yourself for the yummy noises you are about to make while eating it.  Seriously.

Saturday, February 12, 2022

Around the World in Foodventures (Azerbaijan: SHORGOGHAL)

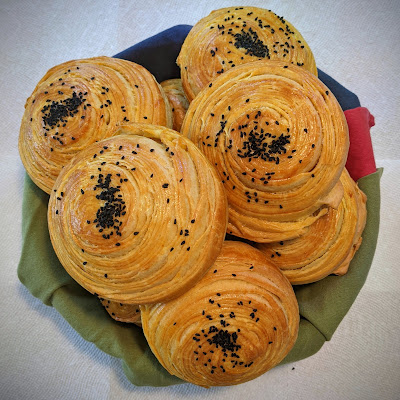
Shorgoghal are laminated (meaning, layered) pastries traditionally prepared for Azerbaijan's Novruz holiday, which celebrates the new year and the coming of spring. I was intrigued to make them because in my world, the majority of pastries are sweet or filled with sweet things. But these are savory and stuffed with a spiced filling (which while savory pastries certainly aren't unheard of, they just isn't as common). So, here we are:


Note -- Things that are grouped by color in my ingredient lists can be measured out into bowls together while getting your Mise en Place, to streamline your process as well as minimize the number of things you'll have to clean later. Anything left white/un-highlighted should be kept separate by itself.

DOUGH INGREDIENTS:
  • 2 teaspoon of Active Dry Yeast
  • 1 Tablespoon of Sugar
  • 1/3 cup of Warm Water
  • 5 cups of All-Purpose Flour
  • 1 teaspoon of Diamond Crystal Kosher Salt (double this if using Morton)
  • ½ teaspoon of Turmeric
  • 1 Egg
  • 1 cup (= ½ pound, or 8 ounces, or 16 Tablespoons, or 2 U.S. sticks) of Unsalted Butter, melted
  • 1 cup of Milk
  • 1-2 cups of Clarified Butter or Ghee (or strained Brown Butter*), melted
  • Extra All-Purpose Flour for dusting
* I went too far with my butter in the clarification process, thus turning it into good ol' Brown Butter -- but that's okay; it still worked great for this recipe (strained, of course -- we don't want the solids here).  If you want to read more about the similarities of and differences between Clarified Butter, Ghee, and Brown Butter -- go here.

FILLING INGREDIENTS:
  • 2 cups of All-Purpose Flour
  • 1 Tablespoon of Fennel Seeds
  • 2 teaspoons of Anise seeds
  • 1 teaspoon of Ground Cumin
  • 1 teaspoon of Turmeric
  • 1 teaspoon of Ground Cinnamon
  • 1 teaspoon of Diamond Crystal Kosher Salt (double this if using Morton)
  • ½ teaspoon of Freshly Ground Black Pepper
  • 1 cup (= ½ pound, or 8 ounces, or 16 Tablespoons, or 2 U.S. sticks) of Unsalted Butter, melted
GLAZE/DECORATION INGREDIENTS:
  • 2 Egg Yolks
  • 1 teaspoon of Olive Oil
  • 1 Tablespoon of Nigella Seeds
TO MAKE THE DOUGH:
  1. Combine the yeast, sugar, and warm water. Set aside for 5-10 minutes to proof.  It should get bubbly/foamy. (If it doesn't get bubbly/foamy, you have one of three problems: your water was too hot--try again with cooler water, your water was too cold--try again with warmer water, or your yeast is unfortunately dead and you'll need to get new yeast before continuing.  The water temperature should be between 105 and 110°F)
  2. Whisk the flour, salt, and turmeric together. Then add the yeast mixture, the egg, the 1 cup of butter, and the milk. Stir to combine into a dough.  (Don't be afraid to add a little bit more water, if it seems too dry; this will depend on many factors such as the temperature in your kitchen, the altitude where you live, etc. -- just go slow and be careful.)
  3. Knead the dough until it's smooth and elastic, but not tight – adding little bits more of flour as needed if it's too sticky.
  4. Put it in a bowl in a warm place and let it rise for 1 to 1.5 hours or until doubled in volume.
TO MAKE THE FILLING:
  1. Roast the 2 cups of All-Purpose Flour in a 350°F oven until it turns a light cream color (this took about 20 minutes with the flour spread out on a baking tray).
  2. Toast the Fennel and Anise seeds on the stovetop (just a couple of minutes over low-to-medium heat) until they are fragrant. Grind them either in a coffee grinder, a spice grinder, or use a mortar and pestle. They don't need to be super fine. Combine with the rest of the spices.
  3. Mix the spices with the roasted flour; then, using a fork, combine with the melted butter until you get a crumbly, wet sand-like mixture.
PUTTING IT ALL TOGETHER:
  1. Divide the dough into 8 equal balls and cover them with a towel to keep moist.
  2. Roll the first ball out into a square that you can just about see through (use dusting flour as necessary – but sparingly – to prevent sticking).  Brush on a generous amount of the Clarified Butter/Ghee/Brown Butter (reserving enough to do the same on each of the next 7 layers to come).  Don’t worry about any holes that may happen; patching isn't necessary.
    You can see here that my squares were the size of my rolling pin, about 18" wide.
  3. Roll the second ball out -- same as the first one -- into a square that you can just about see through (again, use dusting flour as necessary – but sparingly – to prevent sticking). Place it on top of the first one, and brush it with butter just like the first layer (and as before, reserving enough for the remaining layers).  Still, don’t worry about any holes that may happen; patching isn't necessary.**
    ** You may find that the dough retracts some when you pick it up to place it on the layered pile.  But you can utilize the butter that you spread out to sort of stick it down and re-stretch it to fit the same area.
  4. Repeat this process until you are out of dough and butter.
    This is what my pile looked like after 3 layers.
  5. Now, you can either roll the whole layered thing up first, then cut it into pieces about 1-to-2” wide -- or you can cut the layered rectangle into 1-to-2” strips and roll them up individually. (If you go with the former, you can even stretch the full roll out a little more to make it longer before cutting it into individual rolls -- to get more yield. I took this option.)  Either way, you should end up with somewhere in the neighborhood of 14 or 15 pieces that look like this:
    I also had the 2 uneven scraps from the ends that could still be cooked and eaten --
    but I used them for another purpose.  See Step # 9 below....

  6. Let the rolls rest, cut sides up and down, for 10 minutes.
  7. Preheat your oven to 350°F. Prepare enough baking sheets to fit all the rolls plus space in between, with paper.
  8. If necessary, gently seal the end of each roll so that it isn’t sticking out; then, using your fingers inserted into the center of each roll, begin pushing out from the center to make a little crater in which you will put the filling. Be careful not to puncture all the way through– you need the roll to still have a bottom.
  9. Fill the hole in each roll with 1-2 Tablespoons of the spiced filling, then bring the edges together and seal the filling completely in. I found this closing-of-the hole/sealing part to be difficult, and so decided to enlist the uneven scrap ends from the roll --> I divided it up into the same number of rolls I had, flattened each little piece out, and used it to help patch the hole, cover the filling, and seal it in as best I could.  (It ended up working quite well.)
  10. Put the rolls patch/seal-side-down onto your baking sheet, and lightly press each one to flatten into an approximately 4-to -4.5” disc. They should be at least 1-inch apart on the baking sheets.
  11. Mix the egg yolks and olive oil together, and brush some onto the top of each roll. Then sprinkle Nigella seeds all over in any pattern you wish.
  12. Bake for 30 minutes, rotating the pans halfway through -- or until they are golden brown with an internal temperature of ~190°F.
  13. Let them cool before eating. Serve with tea.
    The inside.
I studied three web pages (1, 2, 3) -- and used a combination of them plus other knowledge to write my own recipe that you see above.
 
This post is part of my project: "Around the World in Foodventures" (I decided I want to expand my culinary horizons even further by making the national dish or a popular recipe, or some signature food or traditional meal from every country in the world. Maybe it'll happen alphabetically, or by region, in random order, or something else. I figure if we can't (yet?) travel everywhere, we at least have the luxury of being able to taste it. It’ll be fun and interesting, but obviously, will take a long time to get through -- as I'll only be doing it once a week or so at most. I am chronicling the journey here.)

“If I’m an advocate of anything, it’s to move…Walk in someone else’s shoes or at least eat their food.” --Tony Bourdain

Wednesday, February 9, 2022

Lemongrass & Ginger Chicken Soup

INGREDIENTS:

  • 1 Tablespoon of Vegetable Oil
  • Salt & Pepper
  • ½ a yellow/Vidalia Onion (chopped)
  • ½ of a large Carrot (cubed)
  • 3 stalks of Celery -- I used one from the outside and some from the middle, with leaves (chopped)
  • 6-10 (choose your own adventure) Garlic cloves (minced)
  • 1 large Chicken Breast (cubed)
  • 6 cups of Chicken Stock
  • 2 Tablespoons of Savory
  • ½ of a large Carrot (cut into half-moons)
  • 2 handfuls of Sugar Snap Peas (edge strings removed and cut into thirds)
  • 2 stalks of Lemongrass (cut into 4”-ish lengths and then cut in half longways to expose the centers)
  • 4 slices of Ginger (about ¼” thick each)
  • Young Green Peppercorns in Brine (you can find these at markets selling Southeast Asian products)

DIRECTIONS:

  1. Put the Vegetable Oil into a soup pot and (along with some Salt & Pepper) sauté the Onion, the cubed Carrot, and the Celery until softened and just starting to brown.  Add the Garlic cloves and cook for another couple minutes.
  2. Throw the Chicken into the pot along with the Chicken Stock and Savory.  Low boil this for ~15 minutes until the chicken is cooked.
  3. Put the half-moon Carrots, the Sugar Snap Peas, the Lemongrass, the Ginger, and the Young Green Peppercorns all into the pan.  (It was at the point I realized I needed more liquid, so I poured in enough water to cover everything, plus 3 crushed Maggi chicken cubes – you could just add more Chicken Stock if you have it, or any other combination of flavors and liquids you choose such as Vegetable Stock, Better Than Bouillon, or even plain water.)
  4. Simmer for 10-15 minutes until the vegetables are cooked to your liking, adjust to taste with more Salt & Pepper, and eat!

NOTEThe Lemongrass and Ginger are just there to infuse flavor and aren’t meant to be eaten.  Pick them out either while portioning into bowls, or just avoid them while eating.  The Young Green Peppercorns can be eaten, but don’t have to be (I personally chose to remove them from their stems when putting them into the pot, and eat them – some people prefer to leave them on the stems so they can be more easily removed and not eaten.)

This post is an original recipe that I created from scratch.

My goal is to share my love of food simply -- without all the fluff (unless it's Marshmallow Fluff!), long winded stories, excessive and repetitive photos, or incessant rambling that I see on other blogs.  I personally tend to skip over all that, just scrolling straight to the bottom in hopes of finding the recipe right away.  Therefore, I hope you appreciate the brevity above.

** You'll also never find ads here. **

If you have any questions or comments, please leave them below or
contact me directly using the form near the top of the right-hand column.

Saturday, February 5, 2022

Around the World in Foodventures (Austria: KARDINALSCHNITTEN - "Cardinal Slices")

Popular all over Austria, "cardinal slices" get their name at least partially from their appearance encompassing the colors of the Catholic church -- gold, red, and white.

I'm essentially copying a recipe found on the Vienna Now♦Forever website, but am re-writing it here with a couple of slight adjustments that I made.  I'm also taking this opportunity to show how I like to color-code ingredients for efficiency and clarity, which was particularly helpful to me with this recipe because it's a confusing one.  (It also means I get to put rainbows - or at least partial ones - in my blog. 😃)  

In my opinion, this is one of those things they'd use on The Great British Bake Off as a technical challenge, because it's pretty complicated and a bit hard to follow if you don't already know what you're aiming for.  So, for clarity, I will say right up front that you are basically making a sweet, footlong sandwich filled with cream and raspberries.  The "bread" of this sandwich is made of stripes of two different whipped mixtures (one like meringue, one like cake) that get baked together.  The whole thing gets cut up into individual servings after full assembly -- like one of those huge submarine sandwiches people order for Super Bowl parties.  Here's the final product:


That said, I gathered up my INGREDIENTS as follows (each color represents things you can put together in one container/bowl, and things in the white section should each be kept separate by themselves) --

For the Meringue Mixture:

  • 350 grams of Egg Whites (this was 10-11 eggs worth for me)

  • 240 grams of Powdered Sugar

  • 1/2 teaspoon of Vanilla Extract

  • A pinch of Diamond Crystal Kosher Salt (double this if you are using Morton Kosher)

For the Cake Batter:

  • 3 Eggs

  • 4 Egg Yolks

  • 80 grams of Powdered Sugar

  • The zest of 1 Lemon

For the Creamy Filling:

  • 1 and 2/3 cups of Heavy Cream

  • 2 Tablespoons of Instant Espresso Powder

Ingredients to Keep Separate --

  • 100 grams of All-Purpose Flour

  • Powdered Sugar for dusting

  • 1 small container (mine was 170 grams) of Fresh Raspberries

  • 2 Tablespoons of Raspberry Brandy

  • 4 teaspoons of Advocaat

  • 2 teaspoons of Powdered Gelatin

  • 40 grams of Powdered Sugar

  • A pinch of Diamond Crystal Kosher Salt (double this if you are using Morton Kosher)

  • 1 handful of Shaved Almonds (roasted)


INSTRUCTIONS --
  1. Beat the Meringue Mixture ingredients until thick and stiff (Note: I wouldn't recommend doing this by hand unless you're looking for a real good workout -- it took at least 5 minutes using my handheld electric mixer with the whisk attachments).  Transfer the mixture to a piping bag fitted with a large, round nozzle (or you can use a zip-top plastic bag with one corner snipped off).
  2. Beat the Cake Batter ingredients until fluffy (same as above, I wouldn't recommend doing this by hand -- I beat mine for 2 minutes using my handheld electric mixer with the whisk attachments).  Add in the 100 grams of All-Purpose Flour and beat again until it's mixed well and thicker (this took about a minute with the electric mixer).  Transfer it to another piping bag fitted with a large, round nozzle (or, again, you can use a zip-top plastic bag with one corner snipped off).
  3. Preheat your oven to 355°F (180°C).
  4. Cut two strips of baking paper to lay side-by-side on and cover your baking tray.  On each piece of baking paper squeeze out 3 lines of the Meringue Mixture, about 2 centimeters apart. In between those, squeeze 2 lines of the the Cake Batter.  Dust it all generously with Powdered Sugar.

    It will look like this (before and after the dusting of Powdered Sugar).
    1. Pop the tray into the oven and bake with the door slightly open -- just stick a wooden spoon in there -- for about 20 minutes (or until the Cake Batter is cooked, the Meringue Mixture has firmed and dried).  Everything should have baked into one another, as well, forming two long pieces of striped "bread."  Allow them to cool, then gently turn them upside down and remove the baking paper.
    2. While the "bread" is cooling, marinate the Raspberries in the Brandy.
    3. Whip the Heavy Cream with the Instant Espresso Powder until stiff (you are now making the Creamy Filling).
    4. Heat up the Advocaat and stir in the Powdered Gelatin until it dissolves. Mix this into the Creamy Filling along with the 40 grams of Powdered Sugar and the pinch of Salt.  Allow it all to set in a cool place (I put it in the fridge for a while).
    5. Gently spread half of the Creamy Filling in an even layer onto one of the upside down pieces of "bread" (you're applying the filling to the flat side).  Place the marinated Raspberries (relatively evenly spaced around) on top of this cream, and then gently spread the other half of the Creamy Filling onto the flat side of the other piece of "bread."  Flip it onto the Raspberries-dotted other half of the to complete your "sandwich."
    6. Sprinkle the whole thing with more Powdered Sugar and the Almonds, then slice into portion-sized pieces.
    This is a light and delicious dessert, and tasted a lot like Tiramisu to me.  I do wish the particular flavors of Lemon in the cake, the Raspberry Brandy, and Advocaat came through more, though.  I also felt that the Cake Batter was too runny (but it did work out just fine because it nestles between the Meringue rows -- so maybe it was just as it was supposed to be).  Were I to make this again, I think I might increase the amount of flour a bit to thicken the Cake Batter, as well as add additional lemon zest to it.  I would also increase the amount of Advocaat - both for flavor and because it just didn't seem like enough liquid to dissolve the amount of Gelatin I was adding to it.  Still, it's all very yummy and I am in no way complaining.  I would be happy to pay for this in a restaurant and would be quite satisfied by it.

    This post is part of my project: "Around the World in Foodventures" (I decided I want to expand my culinary horizons even further by making the national dish or a popular recipe, or some signature food or traditional meal from every country in the world. Maybe it'll happen alphabetically, or by region, in random order, or something else. I figure if we can't (yet?) travel everywhere, we at least have the luxury of being able to taste it. It’ll be fun and interesting, but obviously, will take a long time to get through -- as I'll only be doing it once a week or so at most. I am chronicling the journey here.)

    “If I’m an advocate of anything, it’s to move…Walk in someone else’s shoes or at least eat their food.” --Tony Bourdain

    Monday, January 31, 2022

    A More Efficient Way to Mise en Place: Color-Coding!

    This post isn't a recipe, but rather just sharing a thing I do to make my cooking and baking easier.  Becoming slightly annoyed with the number of dishes, small bowls, and other containers I was having to clean afterwards, I decided to up my prep game in a way that minimizes all of that (as well as greatly pleases my deep organizational tendencies).

    "Mise en Place" means assembling, measuring out, and otherwise preparing/chopping all of your ingredients before you start any mixing, cooking, or baking -- this keeps processes flowing smoothly; and prevents you from finding out halfway into your adventure that you don't have a needed ingredient.  And equally importantly, Mise en Place keeps you from rushing to measure out or chop an ingredient after you've already started mixing, cooking, or baking -- which could cause you to burn whatever's already in your pan or let a mixture rest too long while you tangent to gather that next thing you need.

    How did I improve on this well-known and universally used tenet?  Color-coding!  So, now, not only do I use the normal Mise en Place method....but when I read through a recipe in one of my physical cookbooks, I literally highlight ingredients in groups that go into the mixing bowl or pan at the same time.  If I am using an online recipe, I copy it to a new editable document and re-arrange or group, then highlight things there.

    Examples of what I did in a paper cookbook, and to an online recipe I copied into a GoogleDoc.
    This small extra step in the studying and preparation phase lessens the number of dishes, small bowls, and other containers I use while getting everything ready because, instead of measuring everything out into separate containers like I used to, things that will be mixed together or go into the pan at the same time get highlighted in the same color and are measured out into one "group" container.  (If an ingredient should stay separate from the others, I leave it un-highlighted to indicate that one thing going into it's own bowl/container.)

    I will endeavour from now on to write out and present all my recipes in this fashion.

    Saturday, January 29, 2022

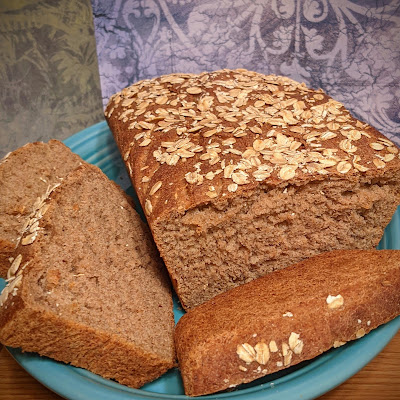
    Blizzard Day Multigrain Whole Wheat Bread

    We're having a blizzard here today, and for breakfast ate the last of the brioche that Hubby made.  So I decided to bake some bread.  I poked around the Internet for ideas, then wrote my own recipe....


    INGREDIENTS:
    • 1 cup + 6 Tablespoons of Warm Water
    • 1-1/4 teaspoons of Active Dry Yeast (4-5 grams)
    • A pinch of Sugar
    • 3/4 cup of Multigrain Flour (85 grams) *see recipe below*
    • 2-2/3 Tablespoons (that's 2 Tablespoons + 2 teaspoons) of Honey (60 grams)
    • 3 Tablespoons of softened/room temperature Butter (divided: 2 Tablespoons for the dough, 1 Tablespoon for greasing your pan)
    • 2-1/4 cups of Whole Wheat Flour (300 grams)
    • 1/2 cup of All-Purpose Flour (70 grams)
    • 1 teaspoon of Diamond Crystal Kosher Salt (3 grams) -- if you're using Morton, reduce this by half
    • 3 Tablespoons of Rolled Oats (for topping the loaves) -- you could use a mix of oats, nuts, seeds, grains, or anything else you like here.
    MULTIGRAIN FLOUR:
    To make my own Multigrain Flour, I used whatever I had on hand (you can mix and match, as well, to your liking).  I threw the following things into my Vitamix (you could also use a food processor) and whizzed it up -- it took less than a minute -- until it became flour:
    • 1 Tablespoon of Rolled Oats
    • 1 Tablespoon of Millet
    • 1 Tablespoon of Chia Seeds
    • 1 Tablespoon of Pepitas
    • 1 Tablespoon of Flax Seeds
    • 1 Tablespoon of (tricolor) Quinoa
    • 1 Tablespoon of Sunflower Seeds
    • 1 Tablespoon of Bulgur Wheat
    This turned out a little more than I needed, so I just measured out the 3/4 cup (85 grams) and will save the rest for some other use.

    PROCEDURE:
    (Note: I did this in a stand mixer, but it can all be done by hand -- mixing and kneading might just take a little longer.)
    • Mix 6 Tablespoons of the warm water with the yeast and the pinch of sugar, and set aside for about 10 minutes until it's bubbly/foamy.  (If it doesn't get bubbly/foamy, you have one of three problems: your water was too hot--try again with cooler water, your water was too cold--try again with warmer water, or your yeast is unfortunately dead and you'll need to get new yeast before continuing.)
    • Pour the remaining 1 cup of warm water into the stand mixer bowl. Add in the multigrain flour and (using the paddle attachment) mix until it's kind of pasty (just a minute or so). Then mix in the honey, 2 Tablespoons of the butter, and the salt until well combined.
    • Once your yeast is proofed (i.e. successfully bubbly/foamy), add it to the bowl; then mix in the whole wheat and all-purpose flours, a little bit at a time.  You should now have a rough, sticky ball of dough.  Scrape down the sides of the bowl, switch to the dough hook, and knead on low speed until the dough ball is smooth and slightly sticky. This should take 10-15 minutes.
    • Scrape anything that might be left stuck to the sides of the bowl, into the ball, and nestle it all into the center of the bottom of the bowl.  Cover the bowl and let it rise in a warm spot until the dough doubles in size.  (The exact length of time needed will depend on how warm and humid it is wherever you put the bowl - I put mine near a heat radiator where the temperature measured ~85 °F, and it took about an hour and a half.)
      Before and After the 1st Rise
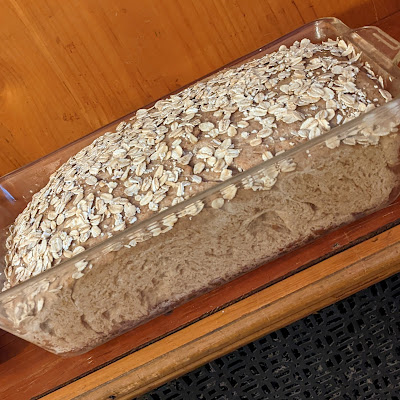
    • Once the dough has risen to double its original size, punch it down and form it into a general loaf shape that will fit in your loaf pan.  Grease the pan using the remaining 1 Tablespoon of butter, put the dough in, and once again leave it someplace warm to rise until it doubles in size a second time.  (Just like before, the exact length of time needed will depend on how warm and humid it is wherever you put the bowl - I put mine back near the heat radiator where the temperature measured ~85 °F, and it took about an hour.)
      Before and After the 2nd Rise
    • When your dough has doubled in size, heat your oven to 375°F.  Brush the top of the loaf lightly (don't deflate it!) with water and then sprinkle on the oats (or whatever you're using here) -- the water will help them stick.
      Just before going into the oven.
    • Bake the loaf in the middle of the oven for about 30 minutes or until the internal temperature reaches 190°F.  Done bread will sound hollow when tapped.
    • As soon as you can, transfer your loaf to a cooling rack to prevent it from steaming inside the pan. Slice and eat it hot, or after it cools, with butter or without, toasted or whatever else floats your boat! 🥰

    This post is an original recipe that I created from scratch.

    My goal is to share my love of food simply -- without all the fluff (unless it's Marshmallow Fluff!), long winded stories, excessive and repetitive photos, or incessant rambling that I see on other blogs.  I personally tend to skip over all that, just scrolling straight to the bottom in hopes of finding the recipe right away.  Therefore, I hope you appreciate the brevity above.

    ** You'll also never find ads here. **

    If you have any questions or comments, please leave them below or
    contact me directly using the form near the top of the right-hand column.