(Food is Love. Food is Culture. Food is Connection. Food is Adventure.)


Monday, January 31, 2022

A More Efficient Way to Mise en Place: Color-Coding!

This post isn't a recipe, but rather just sharing a thing I do to make my cooking and baking easier.  Becoming slightly annoyed with the number of dishes, small bowls, and other containers I was having to clean afterwards, I decided to up my prep game in a way that minimizes all of that (as well as greatly pleases my deep organizational tendencies).

"Mise en Place" means assembling, measuring out, and otherwise preparing/chopping all of your ingredients before you start any mixing, cooking, or baking -- this keeps processes flowing smoothly; and prevents you from finding out halfway into your adventure that you don't have a needed ingredient.  And equally importantly, Mise en Place keeps you from rushing to measure out or chop an ingredient after you've already started mixing, cooking, or baking -- which could cause you to burn whatever's already in your pan or let a mixture rest too long while you tangent to gather that next thing you need.

How did I improve on this well-known and universally used tenet?  Color-coding!  So, now, not only do I use the normal Mise en Place method....but when I read through a recipe in one of my physical cookbooks, I literally highlight ingredients in groups that go into the mixing bowl or pan at the same time.  If I am using an online recipe, I copy it to a new editable document and re-arrange or group, then highlight things there.

Examples of what I did in a paper cookbook, and to an online recipe I copied into a GoogleDoc.
This small extra step in the studying and preparation phase lessens the number of dishes, small bowls, and other containers I use while getting everything ready because, instead of measuring everything out into separate containers like I used to, things that will be mixed together or go into the pan at the same time get highlighted in the same color and are measured out into one "group" container.  (If an ingredient should stay separate from the others, I leave it un-highlighted to indicate that one thing going into it's own bowl/container.)

I will endeavour from now on to write out and present all my recipes in this fashion.
Saturday, January 29, 2022

Blizzard Day Multigrain Whole Wheat Bread

We're having a blizzard here today, and for breakfast ate the last of the brioche that Hubby made.  So I decided to bake some bread.  I poked around the Internet for ideas, then wrote my own recipe....


INGREDIENTS:
  • 1 cup + 6 Tablespoons of Warm Water
  • 1-1/4 teaspoons of Active Dry Yeast (4-5 grams)
  • A pinch of Sugar
  • 3/4 cup of Multigrain Flour (85 grams) *see recipe below*
  • 2-2/3 Tablespoons (that's 2 Tablespoons + 2 teaspoons) of Honey (60 grams)
  • 3 Tablespoons of softened/room temperature Butter (divided: 2 Tablespoons for the dough, 1 Tablespoon for greasing your pan)
  • 2-1/4 cups of Whole Wheat Flour (300 grams)
  • 1/2 cup of All-Purpose Flour (70 grams)
  • 1 teaspoon of Diamond Crystal Kosher Salt (3 grams) -- if you're using Morton, reduce this by half
  • 3 Tablespoons of Rolled Oats (for topping the loaves) -- you could use a mix of oats, nuts, seeds, grains, or anything else you like here.
MULTIGRAIN FLOUR:
To make my own Multigrain Flour, I used whatever I had on hand (you can mix and match, as well, to your liking).  I threw the following things into my Vitamix (you could also use a food processor) and whizzed it up -- it took less than a minute -- until it became flour:
  • 1 Tablespoon of Rolled Oats
  • 1 Tablespoon of Millet
  • 1 Tablespoon of Chia Seeds
  • 1 Tablespoon of Pepitas
  • 1 Tablespoon of Flax Seeds
  • 1 Tablespoon of (tricolor) Quinoa
  • 1 Tablespoon of Sunflower Seeds
  • 1 Tablespoon of Bulgur Wheat
This turned out a little more than I needed, so I just measured out the 3/4 cup (85 grams) and will save the rest for some other use.

PROCEDURE:
(Note: I did this in a stand mixer, but it can all be done by hand -- mixing and kneading might just take a little longer.)
  • Mix 6 Tablespoons of the warm water with the yeast and the pinch of sugar, and set aside for about 10 minutes until it's bubbly/foamy.  (If it doesn't get bubbly/foamy, you have one of three problems: your water was too hot--try again with cooler water, your water was too cold--try again with warmer water, or your yeast is unfortunately dead and you'll need to get new yeast before continuing.)
  • Pour the remaining 1 cup of warm water into the stand mixer bowl. Add in the multigrain flour and (using the paddle attachment) mix until it's kind of pasty (just a minute or so). Then mix in the honey, 2 Tablespoons of the butter, and the salt until well combined.
  • Once your yeast is proofed (i.e. successfully bubbly/foamy), add it to the bowl; then mix in the whole wheat and all-purpose flours, a little bit at a time.  You should now have a rough, sticky ball of dough.  Scrape down the sides of the bowl, switch to the dough hook, and knead on low speed until the dough ball is smooth and slightly sticky. This should take 10-15 minutes.
  • Scrape anything that might be left stuck to the sides of the bowl, into the ball, and nestle it all into the center of the bottom of the bowl.  Cover the bowl and let it rise in a warm spot until the dough doubles in size.  (The exact length of time needed will depend on how warm and humid it is wherever you put the bowl - I put mine near a heat radiator where the temperature measured ~85 °F, and it took about an hour and a half.)
    Before and After the 1st Rise
  • Once the dough has risen to double its original size, punch it down and form it into a general loaf shape that will fit in your loaf pan.  Grease the pan using the remaining 1 Tablespoon of butter, put the dough in, and once again leave it someplace warm to rise until it doubles in size a second time.  (Just like before, the exact length of time needed will depend on how warm and humid it is wherever you put the bowl - I put mine back near the heat radiator where the temperature measured ~85 °F, and it took about an hour.)
    Before and After the 2nd Rise
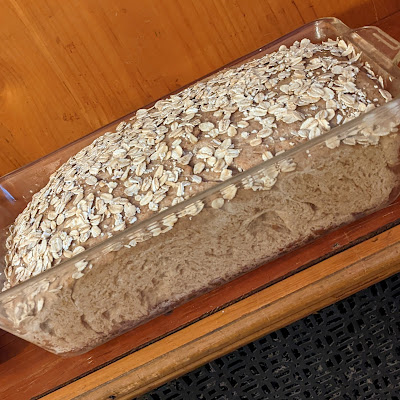
  • When your dough has doubled in size, heat your oven to 375°F.  Brush the top of the loaf lightly (don't deflate it!) with water and then sprinkle on the oats (or whatever you're using here) -- the water will help them stick.
    Just before going into the oven.
  • Bake the loaf in the middle of the oven for about 30 minutes or until the internal temperature reaches 190°F.  Done bread will sound hollow when tapped.
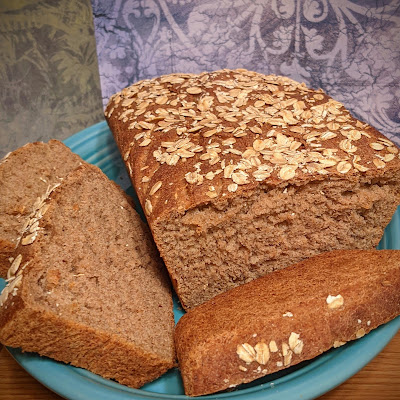
  • As soon as you can, transfer your loaf to a cooling rack to prevent it from steaming inside the pan. Slice and eat it hot, or after it cools, with butter or without, toasted or whatever else floats your boat! 🥰

This post is an original recipe that I created from scratch.

My goal is to share my love of food simply -- without all the fluff (unless it's Marshmallow Fluff!), long winded stories, excessive and repetitive photos, or incessant rambling that I see on other blogs.  I personally tend to skip over all that, just scrolling straight to the bottom in hopes of finding the recipe right away.  Therefore, I hope you appreciate the brevity above.

** You'll also never find ads here. **

If you have any questions or comments, please leave them below or
contact me directly using the form near the top of the right-hand column.