(Food is Love. Food is Culture. Food is Connection. Food is Adventure.)


Showing posts with label cheese. Show all posts

Friday, November 23, 2012

Broccoli Bake

Having trouble getting your kiddos to eat their veggies?  I have the solution!  Lol.  This is an old family recipe of ours, which I suppose I could say is a secret recipe....but I honestly can't imagine that there aren't millions of people all over the country making the same or a very similar dish.  It's very, very easy, but also quite unhealthy and deadly (you'll see), so we reserve it for Thanksgiving and Christmas.  It really wouldn't be good (on your waistline, I mean) to eat this more than a couple times a year.  But it's uber-delicious.

Gather your ingredients:
  • Frozen broccoli (you could use fresh, but you'd have to peel the stalks and then cook it before even starting this recipe; frozen is already prepped and pre-cooked and therefore ready to go)
  • Town House crackers
  • Cheese (we just grab cheese ends from the deli, it really doesn't matter what kind)
  • Butter
  • Non-stick spray
That's it.  Easy peasy.


Chop up the cheese and layer it in your baking dishe(s) with the broccoli....broccoli first, then cheese, then broccoli, then cheese and so forth until the pan(s) are full, but always finishing with cheese on top.


Crush up some crackers in a plastic bag (for this iteration of the recipe, I ended up using one sleeve of crackers per pan).


Cover each pan with a flat layer crushed crackers.


Melt some butter (I simply put it in a measuring cup in the microwave), and pour it over the top.  As if the all the cheese already in there wasn't unhealthy enough, I used 2 full sticks of butter for each pan.  I tried to do a pan with only 1 stick, but the crackers just didn't soak up enough to bake properly.  Trust me.  ;)


Pop it into a 350-degree oven and bake it uncovered until it's bubbly and GB&D (that's golden brown and delicious).  It took about an hour.


Allow it to cool for a few minutes before serving (it needs time for the cheese and butter to firm back up slightly, otherwise you will have a lot of liquid going on in the bottom of the pan).


Eat it and enjoy the hell out of it, but don't dare ask about nutritional content.  We can't count that high.  :)

Sunday, September 30, 2012

Stuffed Pumpkin

It was a pumpkinpalooza of sorts on Facebook last week.  While one of our friends was harvesting oodles of them, another shared this recipe which of course we were quite inclined to try.  Today, a rare Sunday afternoon spent at home, was the day.


It took a bit of time (waiting while it baked), but was otherwise quite easy to do.  The house smelled fantastic and there is no doubt that the original recipe writers were correct to dub it "Pumpkin Stuffed with Everything Good."  I mean, there's bacon, and cheese! - need I say more?  For our version, I made some substitutions, and because the pumpkin I picked up turned out to be 6 pounds, I doubled everything....

INGREDIENTS
  • 1 pumpkin, about 6 pounds
  • Salt and freshly ground pepper
  • 3 rice cakes, chopped into chunks (based on the idea given in the original recipe of, instead of bread, using rice in general)
  • 1/2 pound Gruyere cheese, cubed
  • 8 garlic cloves, coarsely chopped
  • 8 strips of bacon, cooked until crisp, drained, and chopped
  • Dried chives (I used up all that we had left, probably a tablespoon and a half)
  • 1 tablespoon dried thyme
  • 2/3 cup heavy cream
  • Freshly grated nutmeg

PROCESS

1.  Preheat the oven to 350 degrees and line a baking sheet with Silpat (or parchment paper).

2.  Cut a cap out of the top of the pumpkin (think Halloween jack-o'-lantern).  Clean out the seeds and strings, season the inside of the pumpkin generously with salt and pepper, and put it on the baking sheet.


3.  Toss the rice cakes, cheese, garlic, bacon, and herbs together in a bowl. Season with pepper, and pack the mix into the pumpkin.


Obligatory bacon close-up because, well, it's bacon.


The pumpkin should be well filled.  You might have a little too much filling, or you might need to add to it.  I definitely could have used more filling, but since I had already depleted all of several of the ingredients I had on hand, I just left it as is.

4.  Stir the cream with the nutmeg and some salt and pepper and pour it into the pumpkin.


Again, you might have too much or too little — you don't want the ingredients to swim in cream, but you do want them nicely moistened. (Don't worry, it's hard to go wrong here.)

5.  Put the cap in place and bake the pumpkin for about 2 hours, or until everything inside the pumpkin is bubbling and the flesh of the pumpkin is tender enough to be pierced easily with the tip of a knife.  As the original recipe writers suggested, I removed the cap during the last 20 minutes or so, so that any excess moisture could bake away and the top of the stuffing could brown a little.


6.  When the pumpkin is ready, very carefully (it's heavy, hot, and wobbly) bring it to the table or transfer it to a platter that you'll bring to the table.

7.  Allow it to cool until the stuffing solidifies a bit, or if you're impatient like me, scoop all the stuffing out with a spoon into a separate container, slice the pumpkin into wedges, and serve it all up right away.


This was so, so, sooo good.  Bacon, cheese, cream, pumpkin, Autumn.  Yummy, yum yum.

We got 5 servings with stuffing, plus (because I didn't have/make enough stuffing to completely fill the pumpkin) leftovers of 2 slices of pumpkin and the pumpkin meat on the cap, from which I will make soup in the next few days.

Wednesday, August 15, 2012

Goat Cheese and Chive Ravioli, in a Butter and Sage Sauce


On Monday night, because (as usual) we had leftover ingredients lying around, we decided to use up the goat cheese and make ravioli.  Here’s how it went down….

First, I mixed up the pasta dough.  I started with the basic recipe that came with the KitchenAid stand mixer roller attachments, halved, but made some adjustments of my own based on past experiences with it:
  • 1-3/4 cups of all purpose flour
  • 1 teaspoon salt
  • 2 eggs
  • water (the recipe calls for a tablespoon, but the exact amount you will need will always vary depending on humidity and how packed the flour was.  I probably used about 2 tablespoons this time total; you have to go by how the dough looks – see below)
  • chopped dried chives (I’m guessing about a tablespoon’s worth; I didn’t measure)
Into the bowl it all went and was mixed using the regular paddle attachment until it came together into a dough ball (this is the part where you have to add water a teeny bit at a time until it comes together, but if it gets too sticky, you add a little more flour, and so on and so forth until you get the right consistency – able to be formed into a ball, but not sticky).


Next, I switched out the paddle attachment for the dough hook, and kneaded the dough for about two minutes, after which I kneaded by hand it for another two minutes.


I wrapped the dough ball in plastic wrap and stuck it in the fridge, mostly because the recipe I was basing off of said to, but I don’t think this step is truly necessary if you are in a hurry (it’s not like this is pie dough and contains butter that needs to re-harden or anything.  As long as it’s made to the right consistency to begin with, I think you could skip the fridge and start rolling and cutting right away).  All in all, last night’s dough ball probably only spent about 10 minutes in the fridge while I was waiting for Hubby to be ready to make the sauce (that was his half of the responsibility for last night’s dinner festivities).


As for that sauce, I initially was going to simply use the sauce that I had made a few weeks ago and froze, but Hubby found a Butter and Sage Sauce recipe by Mario Batali, so that’s what we ended up deciding on.  The sauce had four simple ingredients:
  • 4 tablespoons butter
  • 8 sage leaves (Hubby substituted about a tablespoon of dried sage leaves instead)
  • 1/2 lemon, juiced
  • 1/4 cup grated Parmesan cheese
Hubby put the sauce together according to Mario’s recipe, except he added the cheese right away instead of waiting for the pasta to be tossed in.  This way the sauce would be waiting for me, all done, as soon as the pasta was cooked.  He also decided after he was done that it might not be enough sauce, so he went back and doubled the recipe.


While he was doing all of this, I was rolling out pasta dough and turning it into raviolis.

First, I divided the dough into four sections and made sure they
had enough flour on the outside to not stick to the rollers.

Next, I started rolling each piece through the machine,
according to the machine's instructions....
 
....until it was as thin as I wanted it.


Next, I cut each strip of flat dough in half, inserted bits of goat cheese
on the bottom layer, wet the seams with water, and covered it with the top layer.
 
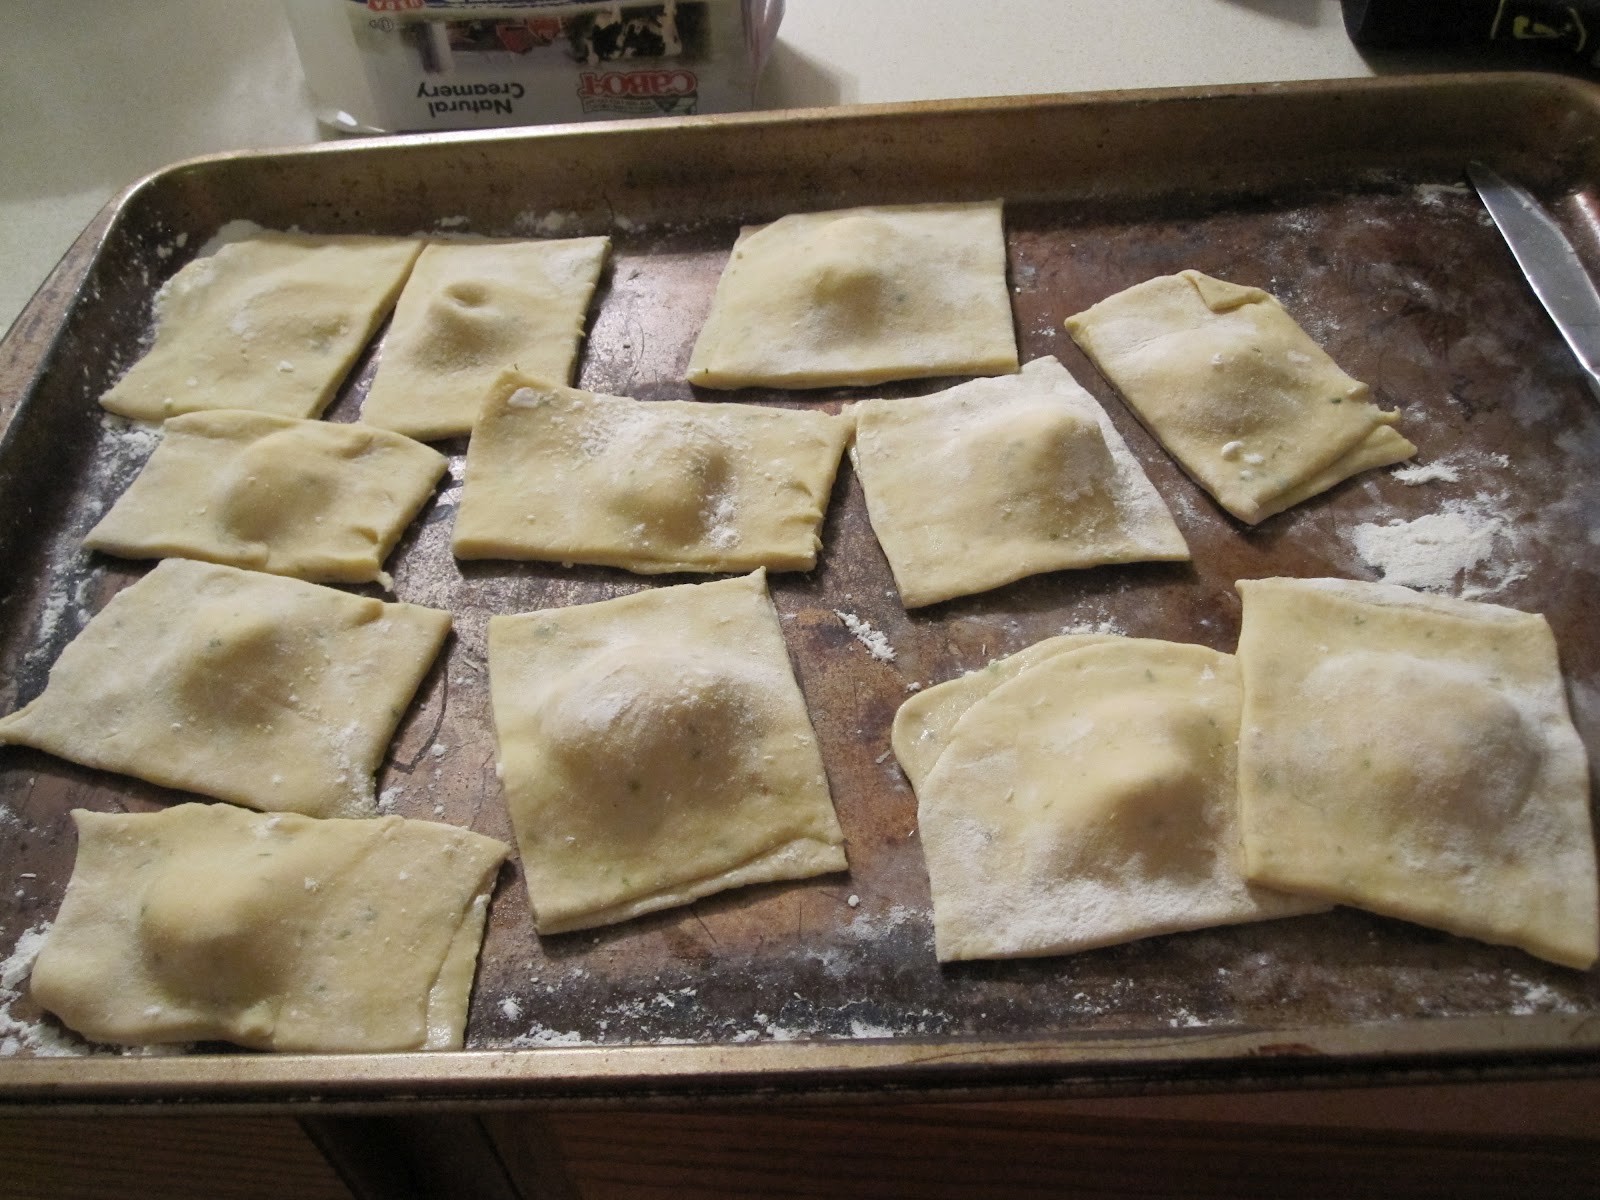
Then I cut them into individual ravioli and trimmed off the excess.

The leftover pieces of dough, which you can see here being cut off and piled
up in the corner of the cookie sheet, were brought back to the rollers
and made into more flat sections/more ravioli.  Nothing got wasted.

We ended up with twelve BIG ravioli.  Just look at those chives peeking through:


Finally, it was time to cook the pasta and toss it in the sauce.


....and.....Presto!  One delicious dinner:


I know you are probably thinking that this is awfully time consuming for a weeknight dinner, but really it’s not.  When making homemade pasta, especially with an electric mixer, you can have your dough mixed and in the fridge in less than 10 minutes.  And while you are waiting for your water to boil is when you do your rolling and cutting.  So, really, other than the extra 10 minutes to make the dough, you are looking at the same amount of time as if you cooked a box of pasta, except this time, you are doing something productive while waiting for the water to boil other than watching the pot – you are rolling and cutting pasta.  I have decided, though, that I would like to invest in some ravioli molds, maybe something like this, in order to be able to make them more uniformly sized and shaped next time.

Thursday, April 19, 2012

Creole-Andouille Macaroni and Cheese

Wow, it’s been a while!  I see that I haven’t posted in over a month, since right before St. Patrick’s Day….but I am here today to inform you that from now on when we want pasta in our house, we get to use our shiny new KitchenAid stand mixer pasta roller attachments (more to be added to that collection in the future I am sure).  Why, you ask?  Because last night, we used up our last box of store-bought pasta in a very, very delicious protein-packed macaroni and cheese recipe, the basis for which I dug up here while searching for ways to use andouille sausage that we’d procured at a lovely local shop called Karl’s Sausage Kitchen. 


Mmmmmm.  Here’s my version of the found recipe:


Ingredients
  • 8 ounces (dry), or one-half box, of Rigatoni pasta
  • 8 ounces of andouille sausage, thinly sliced
  • ½-cup chopped onion
  • ½-cup chopped red bell pepper
  • 2 tablespoons butter
  • 2 tablespoons flour
  • 1 and ½ cups heavy cream
  • 2 cups shredded cheddar cheese (I used one-year aged Vermont cheddar, and shredded it myself)
  • 1 to 2 teaspoons Creole seasoning, depending on the level of spice you desire (I made my own mix from Emeril’s recipe)
  • ¼-cup plain bread crumbs mixed with 1 tablespoon melted butter

Method

1.  Preheat your oven to 350-degrees.

2.  Lightly grease a 2-quart casserole with oil, butter or cooking spray.

3.  Cook the pasta to al dente, drain, rinse and set aside.

4.  In a large skillet, cook the sausage, onion and bell pepper until the onions are translucent.


5.  Remove this mixture from the pan and set aside.

6.  Using the same skillet, melt the 2 tablespoons of butter over medium heat, stir in the flour to make a roux.  Then pour in the heavy cream and the Creole seasoning, stirring frequently until it starts to thicken.  Add the shredded cheese and stir until melted.


7.  Stir the cooked pasta and the sausage-onion-pepper mixture into the cheese sauce, mix well, and then spoon it all into the casserole.


8.  Top with the bread crumb/butter mixture and bake (uncovered) for 30 minutes.


9.  It will be hard resist, but try to let it cool before eating it.  Serves 3 to 4 quite heartily.


The quick and dirty review – We thought this dinner was fantastic and we will surely make this dish again.  Even kitty couldn’t get enough….no really, I had to steal the bowl away from her and then she went into a happy cheese coma.  Enough said.  =)