DOUGH INGREDIENTS:
- 2 teaspoon of Active Dry Yeast
- 1 Tablespoon of Sugar
- 1/3 cup of Warm Water
- 5 cups of All-Purpose Flour
- 1 teaspoon of Diamond Crystal Kosher Salt (double this if using Morton)
- ½ teaspoon of Turmeric
- 1 Egg
- 1 cup (= ½ pound, or 8 ounces, or 16 Tablespoons, or 2 U.S. sticks) of Unsalted Butter, melted
- 1 cup of Milk
- 1-2 cups of Clarified Butter or Ghee (or strained Brown Butter*), melted
- Extra All-Purpose Flour for dusting
* I went too far with my butter in the clarification process, thus turning it into good ol' Brown Butter -- but that's okay; it still worked great for this recipe (strained, of course -- we don't want the solids here). If you want to read more about the similarities of and differences between Clarified Butter, Ghee, and Brown Butter -- go here.
- 2 cups of All-Purpose Flour
- 1 Tablespoon of Fennel Seeds
- 2 teaspoons of Anise seeds
- 1 teaspoon of Ground Cumin
- 1 teaspoon of Turmeric
- 1 teaspoon of Ground Cinnamon
- 1 teaspoon of Diamond Crystal Kosher Salt (double this if using Morton)
- ½ teaspoon of Freshly Ground Black Pepper
- 1 cup (= ½ pound, or 8 ounces, or 16 Tablespoons, or 2 U.S. sticks) of Unsalted Butter, melted
- 2 Egg Yolks
- 1 teaspoon of Olive Oil
- 1 Tablespoon of Nigella Seeds
- Combine the yeast, sugar, and warm water. Set aside for 5-10 minutes to proof. It should get bubbly/foamy. (If it doesn't get bubbly/foamy, you have one of three problems: your water was too hot--try again with cooler water, your water was too cold--try again with warmer water, or your yeast is unfortunately dead and you'll need to get new yeast before continuing. The water temperature should be between 105 and 110°F)
- Whisk the flour, salt, and turmeric together. Then add the yeast mixture, the egg, the 1 cup of butter, and the milk. Stir to combine into a dough. (Don't be afraid to add a little bit more water, if it seems too dry; this will depend on many factors such as the temperature in your kitchen, the altitude where you live, etc. -- just go slow and be careful.)
- Knead the dough until it's smooth and elastic, but not tight – adding little bits more of flour as needed if it's too sticky.
- Put it in a bowl in a warm place and let it rise for 1 to 1.5 hours or until doubled in volume.
- Roast the 2 cups of All-Purpose Flour in a 350°F oven until it turns a light cream color (this took about 20 minutes with the flour spread out on a baking tray).
- Toast the Fennel and Anise seeds on the stovetop (just a couple of minutes over low-to-medium heat) until they are fragrant. Grind them either in a coffee grinder, a spice grinder, or use a mortar and pestle. They don't need to be super fine. Combine with the rest of the spices.
- Mix the spices with the roasted flour; then, using a fork, combine with the melted butter until you get a crumbly, wet sand-like mixture.

- Divide the dough into 8 equal balls and cover them with a towel to keep moist.
- Roll the first ball out into a square that you can just about see through (use dusting flour as necessary – but sparingly – to prevent sticking). Brush on a generous amount of the Clarified Butter/Ghee/Brown Butter (reserving enough to do the same on each of the next 7 layers to come). Don’t worry about any holes that may happen; patching isn't necessary.
You can see here that my squares were the size of my rolling pin, about 18" wide. - Roll the second ball out -- same as the first one -- into a square that you can just about see through (again, use dusting flour as necessary – but sparingly – to prevent sticking). Place it on top of the first one, and brush it with butter just like the first layer (and as before, reserving enough for the remaining layers). Still, don’t worry about any holes that may happen; patching isn't necessary.**
** You may find that the dough retracts some when you pick it up to place it on the layered pile. But you can utilize the butter that you spread out to sort of stick it down and re-stretch it to fit the same area. - Repeat this process until you are out of dough and butter.
This is what my pile looked like after 3 layers. - Now, you can either roll the whole layered thing up first, then cut it into pieces about 1-to-2” wide -- or you can cut the layered rectangle into 1-to-2” strips and roll them up individually. (If you go with the former, you can even stretch the full roll out a little more to make it longer before cutting it into individual rolls -- to get more yield. I took this option.) Either way, you should end up with somewhere in the neighborhood of 14 or 15 pieces that look like this:
I also had the 2 uneven scraps from the ends that could still be cooked and eaten --
but I used them for another purpose. See Step # 9 below.... - Let the rolls rest, cut sides up and down, for 10 minutes.
- Preheat your oven to 350°F. Prepare enough baking sheets to fit all the rolls plus space in between, with paper.
- If necessary, gently seal the end of each roll so that it isn’t sticking out; then, using your fingers inserted into the center of each roll, begin pushing out from the center to make a little crater in which you will put the filling. Be careful not to puncture all the way through– you need the roll to still have a bottom.
- Fill the hole in each roll with 1-2 Tablespoons of the spiced filling, then bring the edges together and seal the filling completely in. I found this closing-of-the hole/sealing part to be difficult, and so decided to enlist the uneven scrap ends from the roll --> I divided it up into the same number of rolls I had, flattened each little piece out, and used it to help patch the hole, cover the filling, and seal it in as best I could. (It ended up working quite well.)
- Put the rolls patch/seal-side-down onto your baking sheet, and lightly press each one to flatten into an approximately 4-to -4.5” disc. They should be at least 1-inch apart on the baking sheets.
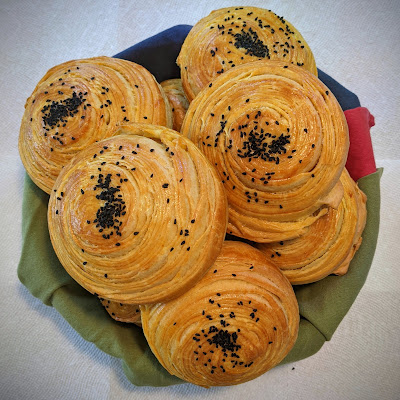
- Mix the egg yolks and olive oil together, and brush some onto the top of each roll. Then sprinkle Nigella seeds all over in any pattern you wish.
- Bake for 30 minutes, rotating the pans halfway through -- or until they are golden brown with an internal temperature of ~190°F.
- Let them cool before eating. Serve with tea.
The inside.


I studied three web pages (1, 2, 3) -- and used a combination of them plus other knowledge to write my own recipe that you see above.
This post is part of my project: "Around the World in Foodventures" (I decided I want to expand my culinary horizons even further by making the national dish or a popular recipe, or some signature food or traditional meal from every country in the world. Maybe it'll happen alphabetically, or by region, in random order, or something else. I figure if we can't (yet?) travel everywhere, we at least have the luxury of being able to taste it. It’ll be fun and interesting, but obviously, will take a long time to get through -- as I'll only be doing it once a week or so at most. I am chronicling the journey here.)
“If I’m an advocate of anything, it’s to move…Walk in someone else’s shoes or at least eat their food.” --Tony Bourdain